Fix “autoreconf: failed to run autopoint: No such file or directory” issue on Suse

On Suse, when executing “autoreconf -i” command in some repository, it prompts following error:

# autoreconf -i
Can't exec "autopoint": No such file or directory at /usr/share/autoconf/Autom4te/FileUtils.pm line 345.
autoreconf: failed to run autopoint: No such file or directory
autoreconf: autopoint is needed because this package uses Gettext

The solution is installing gettext-tools:

# zypper in gettext-tools
Loading repository data...
Reading installed packages...
Resolving package dependencies...

The following NEW package is going to be installed:
  gettext-tools

1 new package to install.
Overall download size: 1.8 MiB. Already cached: 0 B. After the operation, additional 7.9 MiB will be used.
Continue? [y/n/? shows all options] (y): y
Retrieving package gettext-tools-0.19.2-1.103.x86_64                                                   (1/1),   1.8 MiB (  7.9 MiB unpacked)
Checking for file conflicts: .........................................................................................................[done]
(1/1) Installing: gettext-tools-0.19.2-1.103 .........................................................................................[done] 

Then “autoreconf -i” works!


Get SLES needed RPM from OpenSuse

When you build software on SLES, if there is no need RPM provided, you can try to download it from OpenSuse website:https://software.opensuse.org/search . E.g.:

# rpmbuild -bp xen.spec
error: Failed build dependencies:
    figlet is needed by xen-4.5.1_10-1.9.x86_64

When build Xen source code, the SLES doesn’t provide figlet RPM. Download and install this RPM from this link:http://download.opensuse.org/repositories/openSUSE:/13.2/standard/x8664/figlet-2.2.4-12.1.5.x8664.rpm. Then it works!


A brief introduction of zypper

After installing SUSE (my version is SLES 12), the CD/DVD will be added as a default repository:

linux-uibj:~ # zypper repos -d
# | Alias       | Name        | Enabled | Refresh | Priority | Type  | URI                                                         | Service
--+-------------+-------------+---------+---------+----------+-------+-------------------------------------------------------------+--------
1 | SLES12-12-0 | SLES12-12-0 | Yes     | No      |   99     | yast2 | cd:///?devices=/dev/disk/by-id/ata-VBOX_CD-ROM_VB2-01700376 |       

So after you insert the installation ISO file into CDROM, use zypper in command can install the software:

linux-uibj:~ # zypper se systemtap
Loading repository data...
Reading installed packages...

S | Name              | Summary                              | Type
--+-------------------+--------------------------------------+-----------
  | systemtap         | Instrumentation System               | package
  | systemtap         | Instrumentation System               | srcpackage
  | systemtap-docs    | Documents and examples for systemtap | package
  | systemtap-docs    | Documents and examples for systemtap | srcpackage
  | systemtap-runtime | Runtime environment for systemtap    | package
  | systemtap-server  | Systemtap server                     | package
linux-uibj:~ # zypper in systemtap
Loading repository data...
Reading installed packages...
Resolving package dependencies...

The following 3 NEW packages are going to be installed:
  libebl1 systemtap systemtap-runtime

3 new packages to install.
Overall download size: 1.4 MiB. Already cached: 0 B  After the operation, additional 5.7 MiB will be used.
Continue? [y/n/? shows all options] (y):

After removing the repository, even the ISO file is still in CDROM, the zypper in command doesn’t work:

linux-uibj:~ # zypper rr 1
Removing repository 'SLES12-12-0' ...................................................................................................[done]
Repository 'SLES12-12-0' has been removed.
linux-uibj:~ # zypper in systemtap
Warning: No repositories defined. Operating only with the installed resolvables. Nothing can be installed.

You can also add repository’s URL:

linux-uibj:~ # zypper ar http://xxx.net/mrepo/SLE-12-Server-x86_64/disc1/ SLES12-1
Adding repository 'SLES12-1' ........................................................................................................[done]
Repository 'SLES12-1' successfully added
Enabled: Yes
Autorefresh: No
GPG check: Yes
URI: http://xxx.net/mrepo/SLE-12-Server-x86_64/disc1/

linux-uibj:~ # zypper in systemtap
Building repository 'SLES12-1' cache ................................................................................................[done]
Loading repository data...
Reading installed packages...
Resolving package dependencies...

The following 3 NEW packages are going to be installed:
  libebl1 systemtap systemtap-runtime

3 new packages to install.
Overall download size: 1.4 MiB. Already cached: 0 B  After the operation, additional 5.7 MiB will be used.
Continue? [y/n/? shows all options] (y):

Many *-devel packages are in SDK ISO file, so you should also add the SDK ISO into repository.
 

Install SystemTap on Suse

The Suse is SLES(Suse Linux Enterprise Server) version.

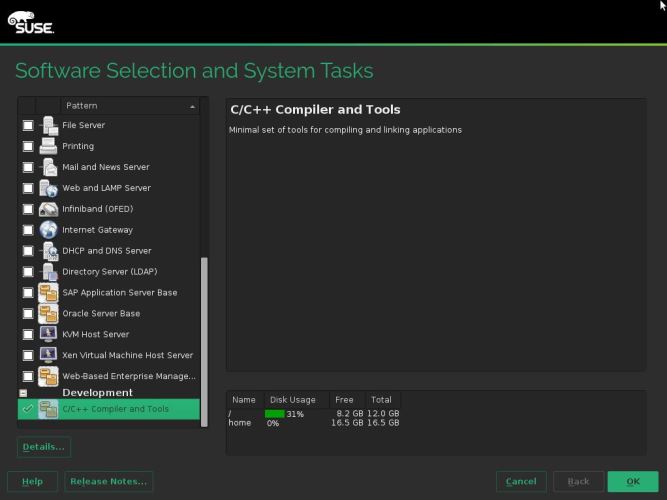
(1) Install C/C++ Compiler and Tools:

Capture4-667x500

(2) Install SystemTap tools:

# zypper in systemtap*
......

(3) Install kernel debug info packages:

/mnt/suse/x86_64 # ls | grep kernel
kernel-default-base-debuginfo-3.12.49-3.1.x86_64.rpm
kernel-default-debuginfo-3.12.49-3.1.x86_64.rpm
kernel-default-debugsource-3.12.49-3.1.x86_64.rpm
kernel-xen-base-debuginfo-3.12.49-3.1.x86_64.rpm
kernel-xen-debuginfo-3.12.49-3.1.x86_64.rpm
kernel-xen-debugsource-3.12.49-3.1.x86_64.rpm
kernelshark-debuginfo-2.0.4-3.95.x86_64.rpm
nfs-kernel-server-debuginfo-1.3.0-13.1.x86_64.rpm
/mnt/suse/x86_64 # rpm -ivh kernel*
Preparing...                          ################################# [100%]
......

You can also use zypper in kernel-*-debug*.

(4) Test:

/mnt/suse/x86_64 # stap -v -e 'probe vfs.read {printf("read performed\n"); exit()}'
Pass 1: parsed user script and 102 library script(s) using 78240virt/28440res/2708shr/26436data kb, in 160usr/20sys/184real ms.
Pass 2: analyzed script: 1 probe(s), 1 function(s), 3 embed(s), 0 global(s) using 175768virt/126996res/3688shr/123964data kb, in 1650usr/250sys/1902real ms.
Pass 3: using cached /root/.systemtap/cache/38/stap_38af4dc0b3509fcb42d451417e95bbab_1375.c
Pass 4: using cached /root/.systemtap/cache/38/stap_38af4dc0b3509fcb42d451417e95bbab_1375.ko
Pass 5: starting run.
read performed
Pass 5: run completed in 20usr/290sys/638real ms.

All is OK!

Why does chainloader complain “invalid signature”?

My computer has multiple harddisks and every disk has multiple partitions. I install the SLES (Suse Linux Enterprise Server) on the 5thpartition of the 2nd harddisk, but find it can’t boot:

grub> set root="(hd1,msdos5)"
grub> chainloader +1
error: invalid signature.

After checking installation steps, I find by default, the SLES can’t install bootcode on the partition:

1

Click the install option in the above picture, then it will install the bootcode :

2

then the boot process is OK!