如何度量代码运行了多少时钟周期(X86平台)

Daniel Lemirebenchmark代码展示了在X86平台上,如何度量一段代码运行了多少时钟周期:

......
#define RDTSC_START(cycles)                                                    \
  do {                                                                         \
    unsigned cyc_high, cyc_low;                                                \
    __asm volatile("cpuid\n\t"                                                 \
                   "rdtsc\n\t"                                                 \
                   "mov %%edx, %0\n\t"                                         \
                   "mov %%eax, %1\n\t"                                         \
                   : "=r"(cyc_high), "=r"(cyc_low)::"%rax", "%rbx", "%rcx",    \
                     "%rdx");                                                  \
    (cycles) = ((uint64_t)cyc_high << 32) | cyc_low;                           \
  } while (0)

#define RDTSC_FINAL(cycles)                                                    \
  do {                                                                         \
    unsigned cyc_high, cyc_low;                                                \
    __asm volatile("rdtscp\n\t"                                                \
                   "mov %%edx, %0\n\t"                                         \
                   "mov %%eax, %1\n\t"                                         \
                   "cpuid\n\t"                                                 \
                   : "=r"(cyc_high), "=r"(cyc_low)::"%rax", "%rbx", "%rcx",    \
                     "%rdx");                                                  \
    (cycles) = ((uint64_t)cyc_high << 32) | cyc_low;                           \
  } while (0)
......
RDTSC_START(cycles_start);                                               
......                                                                   
RDTSC_FINAL(cycles_final);                                               
cycles_diff = (cycles_final - cycles_start);
......

这段代码其实参考自How to Benchmark Code Execution Times on Intel® IA-32 and IA-64 Instruction Set Architectures,原理如下:

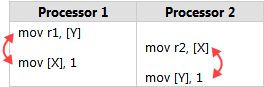
(1)测量开始和结束时的cpuid指令用来防止代码的乱序执行(out-of-order),即保证cpuid之前的指令不会调度到cpuid之后执行,因此两个cpuid指令之间只包含要度量的代码,没有掺杂其它的。

(2)rdtscrdtscp都是读取系统自启动以来的时钟周期数(cycles,高32位保存在edx寄存器,低32位保存在eax寄存器),并且rdtscp保证其之前的代码都已经完成。两次采样值相减就是我们需要的时钟周期数。

综上所述,通过cpuidrdtscrdtscp3条汇编指令,我们就可以计算出一段代码到底消耗了多少时钟周期。

P.S.,stackoverflow也有相关的讨论。

Linux系统上如何查看进程(线程)所运行的CPU

本文介绍如何在Linux系统上查看某个进程(线程)所运行的CPU,但在此之前我们需要弄清楚两个基本概念:

(1)Linux操作系统上的进程和线程没有本质区别,在内核看来都是一个task。属于同一个进程的各个线程共享某些资源,每一个线程都有一个ID,而“主线程”的线程ID同进程ID,也就是我们常说的PID是一样的。

(2)使用lscpu命令,可以得到当前系统CPU的数量:

$ lscpu
......
CPU(s):                24
On-line CPU(s) list:   0-23
Thread(s) per core:    2
Core(s) per socket:    6
Socket(s):             2
......

系统有2个物理CPUSocket(s): 2),每个CPU6coreCore(s) per socket: 6),而每个core又有2hardware threadThread(s) per core: 2)。所以整个系统上一共有2X6X2=24CPU(s):24)个逻辑CPU,也就是实际运行程序的CPU

使用htop命令可以得到进程(线程)所运行的CPU信息,但是htop默认情况下不会显示这一信息:

1
开启方法如下:
(1)启动htop后,按F2Setup):

2
(2) Setup中选择Columns,然后在Available Columns中选择PROCESSOR - ID of the CPU the process last executed, 接下来按F5Add)和F10Done)即可:

3

现在htop就会显示CPU的相关信息了。需要注意的是,其实htop显示的只是“进程(线程)之前所运行的CPU”,而不是“进程(线程)当前所运行的CPU”,因为有可能在htop显示的同时,操作系统已经把进程(线程)调度到其它CPU上运行了。

下面是一个运行时会包含4个线程的程序:

#include <omp.h>

int main(void){

        #pragma omp parallel num_threads(4)
        for(;;)
        {
        }

        return 0;
}

编译并运行代码:

$ gcc -fopenmp thread.c
$ ./a.out &
[1] 17235

使用htop命令可以得到各个线程ID,以及在哪个CPU上运行:

4

参考资料:
How to find out which CPU core a process is running on
闲侃CPU(一)

Profiling CPU使用

本文内容取自于《Systems Performance: Enterprise and the Cloud》

Profiling CPU的方法是通过对CPU状态进行周期性地采样,然后进行分析。包含5个步骤:

1. Select the type of profile data to capture, and the rate.
2. Begin sampling at a timed interval.
3. Wait while the activity of interest occurs.
4. End sampling and collect sample data.
5. Process the data.

CPU采样数据基于下面两个因素:

a. User level, kernel level, or both
b. Function and offset (program-counter-based), function only, partial stack trace, or full stack trace

抓取user levelkernel level所有的函数调用栈固然可以完整地得到CPUprofile,但这样会产生太多的数据。因此通常只采样user levelkernel level部分函数调用栈就可以了,有时可能仅需要保留函数的名字。

下面是一个使用DTraceCPU采样的例子:

 # dtrace -qn 'profile-997 /arg1/ {@[execname, ufunc(arg1)] = count();} tick-10s{exit(0)}'

 top                                                 libc.so.7`0x801154fec                                             1
 top                                                 libc.so.7`0x8011e5f28                                             1
 top                                                 libc.so.7`0x8011f18a9                                             1


Linux kernel 笔记 (60)——scheduling domain

NUMA系统上,由于不同CPU直接访问本地内存和远端内存的时间相差很大,所以更好地调度算法就显得很重要。Linux kernel引入了scheduling domain的概念。可以参看下面例子:

[root@localhost ~]# cd /proc/sys/kernel/sched_domain/
[root@localhost sched_domain]# ls
cpu0  cpu1  cpu2  cpu3  cpu4  cpu5  cpu6  cpu7
[root@localhost sched_domain]# ls -alt *
cpu0:
total 0
dr-xr-xr-x. 1 root root 0 Feb 26 19:37 domain0
dr-xr-xr-x. 1 root root 0 Feb 26 19:37 domain1
dr-xr-xr-x. 1 root root 0 Feb 26 19:37 .
dr-xr-xr-x. 1 root root 0 Feb 26 19:37 ..

cpu1:
total 0
dr-xr-xr-x. 1 root root 0 Feb 26 20:06 domain0
dr-xr-xr-x. 1 root root 0 Feb 26 20:06 domain1
dr-xr-xr-x. 1 root root 0 Feb 26 19:37 .
dr-xr-xr-x. 1 root root 0 Feb 26 19:37 ..

cpu2:
total 0
dr-xr-xr-x. 1 root root 0 Feb 26 20:06 domain0
dr-xr-xr-x. 1 root root 0 Feb 26 20:06 domain1
dr-xr-xr-x. 1 root root 0 Feb 26 19:37 .
dr-xr-xr-x. 1 root root 0 Feb 26 19:37 ..

cpu3:
total 0
dr-xr-xr-x. 1 root root 0 Feb 26 20:06 domain0
dr-xr-xr-x. 1 root root 0 Feb 26 20:06 domain1
dr-xr-xr-x. 1 root root 0 Feb 26 19:37 .
dr-xr-xr-x. 1 root root 0 Feb 26 19:37 ..

cpu4:
total 0
dr-xr-xr-x. 1 root root 0 Feb 26 20:06 domain0
dr-xr-xr-x. 1 root root 0 Feb 26 20:06 domain1
dr-xr-xr-x. 1 root root 0 Feb 26 19:37 .
dr-xr-xr-x. 1 root root 0 Feb 26 19:37 ..

cpu5:
total 0
dr-xr-xr-x. 1 root root 0 Feb 26 20:06 domain0
dr-xr-xr-x. 1 root root 0 Feb 26 20:06 domain1
dr-xr-xr-x. 1 root root 0 Feb 26 19:37 .
dr-xr-xr-x. 1 root root 0 Feb 26 19:37 ..

cpu6:
total 0
dr-xr-xr-x. 1 root root 0 Feb 26 20:06 domain0
dr-xr-xr-x. 1 root root 0 Feb 26 20:06 domain1
dr-xr-xr-x. 1 root root 0 Feb 26 19:37 .
dr-xr-xr-x. 1 root root 0 Feb 26 19:37 ..

cpu7:
total 0
dr-xr-xr-x. 1 root root 0 Feb 26 20:06 domain0
dr-xr-xr-x. 1 root root 0 Feb 26 20:06 domain1
dr-xr-xr-x. 1 root root 0 Feb 26 19:37 .
dr-xr-xr-x. 1 root root 0 Feb 26 19:37 ..

/proc/sys/kernel/sched_domain/目录下每个CPU都有一个自己的目录,并且每个CPU目录下都有和自己相关的domain信息。

multi-level系统中,也拥有multi-levelscheduling domain(内核中结构体是struct sched_domain)。每个scheduling domain包含一组共享属性和调度策略的CPU;每个scheduling domain包含至少一个或多个CPU group(内核中结构体是struct sched_group),每个CPU group会被scheduling domain看做一个独立的单元。

scheduling domain的核心代码位于kernel\sched\core.c中,关于/proc/sys/kernel/sched_domain/cpu$/domain$中各个文件的含义,都可以在这里找到。

NUMA系统上,如果一个node利用率非常高,比如高于90%,而另一个node利用率可能只有60%~70%,这时可以尝试disable wakeup affinity

参考资料:
Scheduling domains
sched-domains.txt
Does domain0 in /proc/sys/kernel/sched_domain/cpu$ refer top-level domain in the system?
How to understan /proc/sys/kernel/sched_domain/cpu$/domain$/flags?

CPU,GPU和GPGPU的区别

下面摘自Why are we still using CPUs instead of GPUs?

GPUs have far more processor cores than CPUs, but because each GPU core runs significantly slower than a CPU core and do not have the features needed for modern operating systems, they are not appropriate for performing most of the processing in everyday computing. They are most suited to compute-intensive operations such as video processing and physics simulations.

GPU(Graphics Processing Unit)core数量比CPU的多,它是显卡(video card)的CPU。由于它的指令集不如CPU强大,但是core数量多,所以适合做一些相对简单的,计算密集性的运算:比如图像处理等等。GPGPU(General Purpose Graphics Processing Unit)则不仅仅只做图像处理的相关运算,也会做一些一般性的运算。

更新:计算机屏幕上的图像是如何显示出来的?这个帖子给了很好的解释:

The GPU has a series of registers that the BIOS maps. These permit the CPU to access the GPU’s memory and instruct the GPU to perform operations. The CPU plugs values into those registers to map some of the GPU’s memory so that the CPU can access it. Then it loads instructions into that memory. It then writes a value to a register that tells the GPU to execute the instructions the CPU loaded into its memory.

The information consists of the software that the GPU needs to run. This software is bundled with the driver and then the driver handles the responsibility split between the CPU and GPU (by running portions of its code on both devices).

The driver then manages a series of “windows” into GPU memory that the CPU can read from and write to. Generally, the access pattern involves the CPU writing instructions or information into mapped GPU memory and then instructing the GPU, through a register, to execute those instruction or process that information. The information includes shader logic, textures, and so on.

简单地讲,CPU会把要显示的图像和指令存到显卡(video card)的register中,然后通知GPU(显卡上的CPU)去执行画图命令。 此外,wiki百科上的这张图形象地描述了整个过程:

CUDA_processing_flow_(En)

参考资料:


为什么单CPU没有“memory reorder”问题?

这篇文章提到单核系统上不会有“memory reorder”问题:

Two threads being timesliced on a single CPU core won’t run into a reordering problem. A single core always knows about its own reordering and will properly resolve all its own memory accesses. Multiple cores however operate independently in this regard and thus won’t really know about each other’s reordering.

仍以Memory Reordering Caught in the Act的图为例:

marked-example2

reordered

其实可以这样理解:单核CPU系统上,多个线程实际是交替顺序执行的,无法真正做到“并行”。无论两个线程或多个线程的代码如何乱序执行,CPU知道它们原本应该的执行顺序,一旦这种乱序会改变程序的运行结果,CPU会做出相应的“补救”措施,比如丢弃结果,重新执行等等,来保证代码会按照应该执行的顺序执行。所以“memory reorder”问题不会在单核系统上出现。

参考资料:
Why doesn’t the instruction reorder issue occur on a single CPU core?
preempt_disable的问题


“Memory order”分析笔记

以下图片摘自Memory Reordering Caught in the Act,它描述了memory reorder问题:
代码:

marked-example2

实际执行:

reordered

为什么会发生memory reorder?一言以蔽之,因为性能。

在支持memory reorder的系统上,有以下3order需要考虑:

Program order: the order in which the memory operations are specified in the code running on a given CPU.

Execution order: the order in which the individual memory-reference instructions are executed on a given CPU. The execution order can differ from program order due to both compiler and CPU-implementation optimizations.

Perceived order: the order in which a given CPU perceives its and other CPUs’ memory operations. The perceived order can differ from the execution order due to caching, interconnect and memory-system optimizations. Different CPUs might well perceive the same memory operations as occurring in different orders.

Program order是代码里访问内存的顺序。Execution order是代码在CPU上实际执行的顺序,由于编译器优化和CPU的实现,实际指令执行的顺序有可能和代码顺序不一样。Perceived orderCPU用来“感知”自己或者其它CPU对内存操作,由于cachinginterconnect等原因,这个顺序有可能与代码实际的execution order不同。


关于memory order的总结:

A given CPU always perceives its own memory operations as occurring in program order. That is, memory-reordering issues arise only when a CPU is observing other CPUs’ memory operations.

An operation is reordered with a store only if the operation accesses a different location than does the store.

Aligned simple loads and stores are atomic.

Linux-kernel synchronization primitives contain any needed memory barriers, which is a good reason to use these primitives.

参考资料:
Memory Reordering Caught in the Act
Memory Ordering in Modern Microprocessors, Part I

“/dev/tty”,“/dev/console”和“/dev/tty0”的区别

这篇笔记来自于stackoverflow的一篇帖子,答案如下:

From the documentation(http://www.kernel.org/doc/Documentation/devices.txt):

    /dev/tty        Current TTY device
    /dev/console    System console
    /dev/tty0       Current virtual console

In the good old days /dev/console was System Administrator console. And TTYs were users' serial devices attached to a server.
Now /dev/console and /dev/tty0 represent current display and usually are the same. You can override it for example by adding console=ttyS0 to grub.conf. After that your /dev/tty0 is a monitor and /dev/console is /dev/ttyS0.

An exercise to show the difference between /dev/tty and /dev/tty0:

Switch to the 2nd console by pressing Ctrl+Alt+F2. Login as root. Type "sleep 5; echo tty0 > /dev/tty0". Press Enter and switch to the 3rd console by pressing Alt+F3.
Now switch back to the 2nd console by pressing Alt+F2. Type "sleep 5; echo tty > /dev/tty", press Enter and switch to the 3rd console.

You can see that "tty" is the console where process starts, and "tty0" is a always current console.

早些时候,/dev/console是系统管理员控制台,而TTYs则代表用户连接服务器的串行设备。而现在,/dev/console/dev/tty0均指当前的显示设备,并且通常情况下是一样的。你可以修改/dev/console所关联的设备。举个例子,在grub.conf中加入console=ttyS0。则现在,/dev/tty0所关联的是显示器,而dev/console则关联/dev/ttyS0

/dev/tty是当前进程控制的tty设备,而tty0则是当前的控制台。当你在一个终端执行“sleep 5; echo tty0 > /dev/tty0”命令后,切换到其它终端,则tty0会在你切换后的终端显示。而执行“sleep 5; echo tty > /dev/tty”命令后,无论切换到那个终端,tty始终会在输入命令的终端显示。


PCI寻址笔记

Linux现在支持多个PCI domain,每个PCI domain管理256bus2^8),每个bus上可以挂载322^5)个设备,每个设备最多支持82^3)个function。同一PCI bus上的设备共享memory locationI/O port的地址空间,而configuration register则不是。每个PCI设备的configuration register256个字节。

执行“lspci -D”命令显示当前系统的PCI设备信息。格式为:domain:bus:dev:func

[root@localhost ~]# lspci -D
0000:00:00.0 Host bridge: Intel Corporation 440FX - 82441FX PMC [Natoma] (rev 02)
0000:00:01.0 ISA bridge: Intel Corporation 82371SB PIIX3 ISA [Natoma/Triton II]
0000:00:01.1 IDE interface: Intel Corporation 82371AB/EB/MB PIIX4 IDE (rev 01)
0000:00:02.0 VGA compatible controller: InnoTek Systemberatung GmbH VirtualBox Graphics Adapter
0000:00:03.0 Ethernet controller: Intel Corporation 82540EM Gigabit Ethernet Controller (rev 02)
0000:00:04.0 System peripheral: InnoTek Systemberatung GmbH VirtualBox Guest Service
0000:00:05.0 Multimedia audio controller: Intel Corporation 82801AA AC'97 Audio Controller (rev 01)
0000:00:06.0 USB controller: Apple Inc. KeyLargo/Intrepid USB
0000:00:07.0 Bridge: Intel Corporation 82371AB/EB/MB PIIX4 ACPI (rev 08)
0000:00:0b.0 USB controller: Intel Corporation 82801FB/FBM/FR/FW/FRW (ICH6 Family) USB2 EHCI Controller
0000:00:0d.0 SATA controller: Intel Corporation 82801HM/HEM (ICH8M/ICH8M-E) SATA Controller [AHCI mode] (rev 02)

“Understanding Caching”笔记

本文是“Understanding Caching”的笔记:

(1)什么是cache line

A cache line is the smallest unit of memory that can be transferred to or from a cache. The essential elements that quantify a cache are called the read and write line widths. These signify the minimum amount of data the cache must read or write from the memory or cache below it. Frequently, these quantities are the same, so caches often are quantified simply by the line width. Even if they differ, the longest width usually is called the line width.

(2)inclusiveexclusive

A multilevel cache can be either inclusive or exclusive. Exclusive means a particular cache line may be present in exactly one of the cache levels and no more than one. Inclusive means the line may be present simultaneously in more than one level of cache. Nothing prevents the line widths from being different in differing cache levels.

(3)Write throughwrite back

Write through means the cache may store a copy of the data, but the write must be completed at the next level down before it can be signaled as complete to the layer above. Write back means a write may be considered complete as soon as the data is stored in the cache. For a write back cache, as long as the written data is not transmitted, the cache line is considered dirty, because it ultimately must be written out to the level below.

(4)Coherency

A cache line is termed coherent when the data in the line is identical to the data stored in the main memory being cached. If this is not true, the cache line is termed incoherent.

没有coherency带来的两个问题:
a)所有种类cache都有可能发生(stale data):主存数据更新了,但是cache数据不是最新的。因此会导致读错误。如下图所示:

7105f1.inline

这是一个暂时的错误,因为正确的数据在主存中,只需cache重新读一下即可。

b)这种错误只发生在write back cache中:主存和cache里分别更新了数据,现在要使二者数据一致。由于每次cache要更新一个cache line,所以必然要导致更新的数据出现不一致。如下图所示:

7105f2.inline