Go
语言变量定义的一个好的实践技巧是:
(1)如果变量声明时会被赋给数据类型的非“0
”值,则使用“:=
”这种方式:
a := 3
b := fun1()
(2)否则,因为所有变量声明时都会初始化为数据类型的“0
”值,则使用var
关键字定义这种方式:
var a int;
Go
语言变量定义的一个好的实践技巧是:
(1)如果变量声明时会被赋给数据类型的非“0
”值,则使用“:=
”这种方式:
a := 3
b := fun1()
(2)否则,因为所有变量声明时都会初始化为数据类型的“0
”值,则使用var
关键字定义这种方式:
var a int;
git branch
命令列出repository
中所有的branch
:
[root@localhost git_repo]# git branch
* master
git branch <branch-name>
会从当前working directory
中fork
出一个新的branch
:
[root@localhost git_repo]# git branch crazy
git checkout <branch-name>
会切换到指定branch
的working directory
:
[root@localhost git_repo]# git checkout crazy
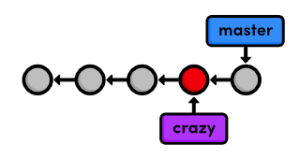
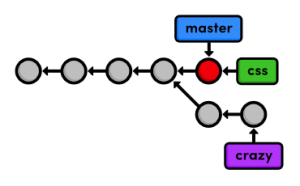
Fast-forwarding merge
:把fork
出来的branch merge
回原branch
时,如果原branch
和fork
出来的branch
没有分叉,也即还在fork
出来的branch
的revision history
里,则直接让原branch
的HEAD
指向现在fork
出来的branch的
snapshot
即可。如下图所示:
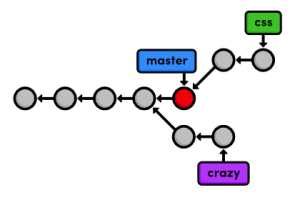
与fast-forwarding merge
相对应的是3-way merge
:两个branch
之间存在着分叉,这时merge
回branch
需要产生一个新的commit
:
参考资料:
Branches, Part I;
Branches, Part II。
使用git revert
命令取消已经committed
的操作。举例如下:
[root@localhost git_repo]# git log --oneline
4a95041 Add a crazzzy experiment
5f08b5f Add navigation links
7f9fa70 Create blue and orange pages
7807520 Commit the first version of index.html.
如果想取消最后一次commit
(commit ID
是4a95041
),使用git revert 4a95041
命令:
[root@localhost git_repo]# git revert 4a95041
[master 0b959a0] Revert "Add a crazzzy experiment"
Committer: root <root@localhost.localdomain>
Your name and email address were configured automatically based
on your username and hostname. Please check that they are accurate.
You can suppress this message by setting them explicitly. Run the
following command and follow the instructions in your editor to edit
your configuration file:
git config --global --edit
After doing this, you may fix the identity used for this commit with:
git commit --amend --reset-author
1 file changed, 14 deletions(-)
delete mode 100644 crazy.html
[root@localhost git_repo]# git log --oneline
0b959a0 Revert "Add a crazzzy experiment"
4a95041 Add a crazzzy experiment
5f08b5f Add navigation links
7f9fa70 Create blue and orange pages
7807520 Commit the first version of index.html.
现在第三次和第五次commit
代表相同的snapshot
。并且第四次commit
还在revision history
中,以后也可以恢复到第四次commit
的内容。要注意,git revert
命令使用的commit ID
是要取消操作的commit ID
,不是要“回滚”到的commit ID
。
取消还没committed
的操作分以下两种情况:
(1)Tracked
文件:git reset --hard
命令会把所有tracked
文件恢复到最近一次committed
状态。加上--hard
选项会真正更新文件,否则只是unstage
文件,但文件的内容还是变化了。
(2)Untracked
文件:git clean -f
会删除所有untracked
文件。
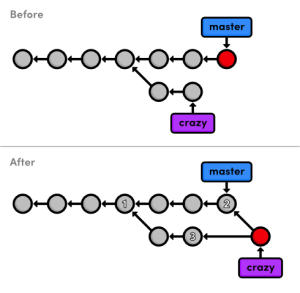
git reset
取消working directory
和staged snapshot
的操作,而git revert
是取消committed snapshots
的操作。如下图所示:
参考资料:
Undoing Changes。
在一个普通的文件夹下使用git init
命令就会创建一个.git
文件夹,原来的文件夹就变成了一个git repository
。关于repository
所有的变动都记录在这个.git
文件夹中,所以.git
文件夹就是git repository
和普通文件夹的唯一区别。把它删除了,git repository
也就变成了普通文件夹。
在git
中,提交一次操作进版本库的包含两个步骤:staging
和committing
。如下图所示:
(1)Staging
:git add
操作。修改后的文件只是进入了staging
区域,还没有进入最后的版本库。Staging
中的修改会在下一次git commit
操作中提交进版本库。Staging
中的文件状态也被称作snapshot
。Staging
可以使用户把相关的改动保存在一个snapshot
中,这样保证每次commit
都是有关联,有意义的。
(2)Committing
:git commit
操作。把staging
区域中的snapshot
提交进版本库。
另外,git status
命令显示当前repository
中所有文件的状态,比如哪些文件处于staging
区域,而git log
则会显示已经进入版本库的revision history
。如下图所示:
参考资料:
The Basics。
“Magic SysRq key
”是一种组合键(例如在X86
平台,是ALT-SysRq-<command key>
),除非kernel
被完全锁定(连中断都无法处理),否则就会响应这个组合键。这是一个很好的调试kernel
方法。
要使用“magic SysRq key
”功能,编译kernel
时CONFIG_MAGIC_SYSRQ
要选择yes
:“make menuconfig
”->“Kernel hacking
”->“Magic SysRq key
”。当“magic SysRq key
”功能编译进kernel
后,可以通过/proc/sys/kernel/sysrq
文件控制“magic SysRq key
”键的功能。这个文件里的默认值是CONFIG_MAGIC_SYSRQ_DEFAULT_ENABLE
这个配置项的值。例如:
0:关闭所有“`magic SysRq key`”功能
1:开启所有“`magic SysRq key`”功能
......
要注意/proc/sys/kernel/sysrq
只能影响通过键盘使用“magic SysRq key
”键的功能。而通过访问/proc/sysrq-trigger
使用“magic SysRq key
”键的功能则总是允许的。
常用的命令包括:
重启系统 (在系统hung住时特别管用):
echo b > /proc/sysrq-trigger
让系统crash:
echo c > /proc/sysrq-trigger
......
具体请参考kernel
文档。
参考资料:
(1)magic sysrq: a linux system debugging technique;
(2)sysrq.txt。
Lua
中单行注释是以“--
”开头,多行注释以“--[[
”开头,以“]]
”结尾。举例如下:
-- your code goes here
--[[
print("Hello")
--]]
上面以“--[[
”开头,“--]]
”结尾注释代码是一个小技巧。一旦想使这段被注释的代码生效,只要把“--[[
”改成“---[[
”即可。这样就变成了两个单行注释:
-- your code goes here
---[[
print("Hello")
--]]
运行如下:
Hello
本文介绍如何删除自己编译安装的内核:
(1)在/boot
文件夹下删除相关文件:
/boot/vmlinuz*KERNEL-VERSION*
/boot/initrd*KERNEL-VERSION*
/boot/System-map*KERNEL-VERSION*
/boot/config-*KERNEL-VERSION*(如果存在)
(2)删除和这个kernel
相关的module
文件夹。默认是在/lib/modules
这个目录下:
/lib/modules/*KERNEL-VERSION*/
(3)修改grub
启动文件:删除相应的menuentry
,并记得修改default
值。
irq_remap_ops
定义在drivers\iommu\irq_remapping.h
中:
struct irq_remap_ops {
/* Check whether Interrupt Remapping is supported */
int (*supported)(void);
/* Initializes hardware and makes it ready for remapping interrupts */
int (*prepare)(void);
/* Enables the remapping hardware */
int (*enable)(void);
/* Disables the remapping hardware */
void (*disable)(void);
/* Reenables the remapping hardware */
int (*reenable)(int);
/* Enable fault handling */
int (*enable_faulting)(void);
/* IO-APIC setup routine */
int (*setup_ioapic_entry)(int irq, struct IO_APIC_route_entry *,
unsigned int, int,
struct io_apic_irq_attr *);
/* Set the CPU affinity of a remapped interrupt */
int (*set_affinity)(struct irq_data *data, const struct cpumask *mask,
bool force);
/* Free an IRQ */
int (*free_irq)(int);
/* Create MSI msg to use for interrupt remapping */
void (*compose_msi_msg)(struct pci_dev *,
unsigned int, unsigned int,
struct msi_msg *, u8);
/* Allocate remapping resources for MSI */
int (*msi_alloc_irq)(struct pci_dev *, int, int);
/* Setup the remapped MSI irq */
int (*msi_setup_irq)(struct pci_dev *, unsigned int, int, int);
/* Setup interrupt remapping for an HPET MSI */
int (*setup_hpet_msi)(unsigned int, unsigned int);
};
extern struct irq_remap_ops intel_irq_remap_ops;
extern struct irq_remap_ops amd_iommu_irq_ops;
可以看到,在结构体中定义了一系列的函数指针,每个函数的作用都写得很清楚。
针对intel
处理器的结构体定义在drivers\iommu\intel_irq_remapping.c
:
struct irq_remap_ops intel_irq_remap_ops = {
.supported = intel_irq_remapping_supported,
.prepare = dmar_table_init,
.enable = intel_enable_irq_remapping,
.disable = disable_irq_remapping,
.reenable = reenable_irq_remapping,
.enable_faulting = enable_drhd_fault_handling,
.setup_ioapic_entry = intel_setup_ioapic_entry,
.set_affinity = intel_ioapic_set_affinity,
.free_irq = free_irte,
.compose_msi_msg = intel_compose_msi_msg,
.msi_alloc_irq = intel_msi_alloc_irq,
.msi_setup_irq = intel_msi_setup_irq,
.setup_hpet_msi = intel_setup_hpet_msi,
};
AMD
相关的暂不讨论。
在enable_IR_x2apic
函数(arch\x86\kernel\apic
)中,包含着irq_remap_ops
中初始化相关函数的调用:
void __init enable_IR_x2apic(void)
{
......
/* Make sure irq_remap_ops are initialized */
setup_irq_remapping_ops();
hardware_init_ret = irq_remapping_prepare();
if (hardware_init_ret && !x2apic_supported())
return;
......
if (hardware_init_ret)
ret = -1;
else
ret = enable_IR();
......
}
(1)
void __init setup_irq_remapping_ops(void)
{
remap_ops = &intel_irq_remap_ops;
#ifdef CONFIG_AMD_IOMMU
if (amd_iommu_irq_ops.prepare() == 0)
remap_ops = &amd_iommu_irq_ops;
#endif
}
这个函数会让全局变量remap_ops
这个指针指向intel_irq_remap_ops
或amd_iommu_irq_ops
。
(2)
int __init irq_remapping_prepare(void)
{
if (!remap_ops || !remap_ops->prepare)
return -ENODEV;
return remap_ops->prepare();
}
irq_remapping_prepare
会调用prepare
函数(Intel
平台即dmar_table_init
)。
(3)
int __init enable_IR(void)
{
#ifdef CONFIG_IRQ_REMAP
if (!irq_remapping_supported()) {
pr_debug("intr-remapping not supported\n");
return -1;
}
if (!x2apic_preenabled && skip_ioapic_setup) {
pr_info("Skipped enabling intr-remap because of skipping "
"io-apic setup\n");
return -1;
}
return irq_remapping_enable();
#endif
return -1;
}
在enable_IR
中会调用irq_remapping_supported
和irq_remapping_enable
:
int irq_remapping_supported(void)
{
if (disable_irq_remap)
return 0;
if (!remap_ops || !remap_ops->supported)
return 0;
return remap_ops->supported();
}
int __init irq_remapping_enable(void)
{
int ret;
if (!remap_ops || !remap_ops->enable)
return -ENODEV;
ret = remap_ops->enable();
if (irq_remapping_enabled)
irq_remapping_modify_x86_ops();
return ret;
}
会先后调用supported
(Intel
平台即为intel_irq_remapping_supported
)和enable
函数(Intel
平台即为intel_enable_irq_remapping
)。
irq_remapping_modify_x86_ops
会把其它函数赋值给相应的全局函数指针:
static void __init irq_remapping_modify_x86_ops(void)
{
x86_io_apic_ops.disable = irq_remapping_disable_io_apic;
x86_io_apic_ops.set_affinity = set_remapped_irq_affinity;
x86_io_apic_ops.setup_entry = setup_ioapic_remapped_entry;
x86_io_apic_ops.eoi_ioapic_pin = eoi_ioapic_pin_remapped;
x86_msi.setup_msi_irqs = irq_remapping_setup_msi_irqs;
x86_msi.setup_hpet_msi = setup_hpet_msi_remapped;
x86_msi.compose_msi_msg = compose_remapped_msi_msg;
}
看一下main
函数:
int main(int argc, char **argv)
{
int ret = EXIT_FAILURE;
int flags = 0, script;
int base;
if (argv[0] && argv[0][0]) progname = argv[0];
lua_State *ls = lua_open();
if (!ls) {
l_message(progname, "cannot create state: not enough memory");
return ret;
}
g_ls = ls;
script = collectargs(argv, &flags);
if (script <= 0) { /* invalid args? */
print_usage();
return 0;
}
if (flags & FLAGS_VERSION)
print_version();
luaL_openlibs(ls); /* open libraries */
// Get package.preload so we can store builtins in it.
lua_getglobal(ls, "package");
lua_getfield(ls, -1, "preload");
lua_remove(ls, -2); // Remove package
// Store uv module definition at preload.uv
lua_pushcfunction(ls, luaopen_luv);
lua_setfield(ls, -2, "uv");
luaL_openlib(ls, "shark", ll_shark, 0);
lua_getglobal(ls, "shark");
lua_pushboolean(ls, shark_verbose);
lua_setfield(ls, -2, "verbose");
lua_pop(ls, 1);
int narg = getargs(ls, argv, script); /* collect arguments */
lua_setglobal(ls, "arg");
#include "shark_init.h"
luaL_loadbuffer(ls, luaJIT_BC_shark_init, luaJIT_BC_shark_init_SIZE,
NULL);
if((ret = lua_pcall(ls, 0, 0, 0))) {
ret = lua_report(ls, ret);
goto out;
}
g_event_loop = luv_loop(ls);
if((ret = luaL_loadfile(ls, argv[script]))) {
ret = lua_report(ls, ret);
goto out;
}
base = lua_gettop(ls) - 1;
lua_pushcfunction(ls, lua_traceback);
lua_insert(ls, base);
if (lua_pcall(ls, 0, 0, base)) {
fprintf(stderr, "%s\n", lua_tostring(ls, -1));
exit(EXIT_FAILURE);
}
lua_pop(ls, 1);
//TODO: move to lua init code
uv_run(g_event_loop, UV_RUN_DEFAULT);
ret = 0;
out:
lua_close(ls);
return ret;
}
(1)
if (argv[0] && argv[0][0]) progname = argv[0];
progname
存的是运行程序名字:/path/to/shark
。
(2)
lua_State *ls = lua_open();
if (!ls) {
l_message(progname, "cannot create state: not enough memory");
return ret;
}
g_ls = ls;
创建一个新的Lua
运行环境,为了后续使用。
(3)
script = collectargs(argv, &flags);
if (script <= 0) { /* invalid args? */
print_usage();
return 0;
}
if (flags & FLAGS_VERSION)
print_version();
先看一下print_version
:
static void print_version(void)
{
fputs(SHARK_VERSION " -- " SHARK_COPYRIGHT ". " SHARK_URL "\n", stdout);
exit(0);
}
比较简单,打印出版本就退出了。
再看一下print_usage
:
static void print_usage(void)
{
fprintf(stderr,
"usage: shark [options]... [script [args]...].\n"
"Available options are:\n"
" -v Show version information.\n");
fflush(stderr);
}
可以看到shark
的使用方法:
shark [options]... [script [args]...]
shark
程序后面跟着可选参数,还有执行脚本。
(4)
luaL_openlibs(ls); /* open libraries */
加载Luajit
提供的函数库。
(5)
// Get package.preload so we can store builtins in it.
lua_getglobal(ls, "package");
lua_getfield(ls, -1, "preload");
lua_remove(ls, -2); // Remove package
lua_getglobal(ls, "package");
用来把package
这个table
压入堆栈:
___________________________
|____ package(类型:table)___| (-1)
lua_getfield(ls, -1, "preload");
用来从index
是-1
处取出key
为preload
的值,也就是:package.preload
这个table
,并压入堆栈:
___________________________
|package.preload(类型:table)| (-1)
|____ package(类型:table)___| (-2)
lua_remove(ls, -2);
把package
从堆栈中移除:
___________________________
|package.preload(类型:table)| (-1)
(6)
// Store uv module definition at preload.uv
lua_pushcfunction(ls, luaopen_luv);
lua_setfield(ls, -2, "uv");
lua_pushcfunction(ls, luaopen_luv);
把luaopen_luv
函数压入堆栈:
___________________________
|__luaopen_luv(类型:函数)___| (-1)
|package.preload(类型:table)| (-2)
lua_setfield(ls, -2, "uv");
执行效果是:package.preload.uv = luaopen_luv
,然后把luaopen_luv
弹出堆栈:
____________________________________________
|package.preload(类型:table,uv = luaopen_luv)| (-1)
(7)
luaL_openlib(ls, "shark", ll_shark, 0);
ll_shark
数组定义如下:
static const struct luaL_reg ll_shark[] = {
{"debuginfo_set", &shark_api_debuginfo_set},
{"lua_ref", &shark_api_lua_ref},
{"get_ref", &shark_api_get_ref},
{"stats", &shark_api_stats},
{"set_binary", &shark_api_set_binary},
{"exec", &shark_api_exec},
//TODO: move to sock library
#ifndef BPF_DISABLE
{"open_raw_sock", &shark_api_open_raw_sock},
{"sock_attach_bpf", &shark_api_sock_attach_bpf},
{"iptos", &shark_api_iptos},
#endif
{NULL, NULL}
};
luaL_openlib(ls, "shark", ll_shark, 0);
函数的作用是创建一个table
,然后将这个table
赋给package.loaded[shark]
和全局变量shark
,并将ll_shark
数组中的函数注册到这个table
,最后把table
压入堆栈:
————————————————————————————————————————————
|___一个注册ll_shark函数数组的table___________| (-1)
|package.preload(类型:table,uv = luaopen_luv)| (-2)
(8)
lua_getglobal(ls, "shark");
lua_pushboolean(ls, shark_verbose);
lua_setfield(ls, -2, "verbose");
lua_pop(ls, 1);
lua_getglobal(ls, "shark");
把shark table
压入堆栈:
____________________________________________
| shark(类型:table) | (-1)
————————————————————————————————————————————
|___一个注册ll_shark函数数组的table___________| (-2)
|package.preload(类型:table,uv = luaopen_luv)| (-3)
lua_pushboolean(ls, shark_verbose);
将shark_verbose
这个布尔值压入堆栈:
_____________________________________________
| ______shark_verbose(类型:bool)_____________| (-1)
| shark(类型:table) | (-2)
————————————————————————————————————————————
|___一个注册ll_shark函数数组的table___________| (-3)
|package.preload(类型:table,uv = luaopen_luv)| (-4)
lua_setfield(ls, -2, "verbose");
执行效果是:shark.verbose = shark_verbose
,然后把shark_verbose
弹出堆栈:
____________________________________________
| shark(类型:table, verbose = shark_verbose) | (-1)
————————————————————————————————————————————
|___一个注册ll_shark函数数组的table___________| (-2)
|package.preload(类型:table,uv = luaopen_luv)| (-3)
lua_pop(ls, 1);
把栈顶元素弹出堆栈:
————————————————————————————————————————————
|___一个注册ll_shark函数数组的table___________| (-1)
|package.preload(类型:table,uv = luaopen_luv)| (-2)
(9)
int narg = getargs(ls, argv, script); /* collect arguments */
lua_setglobal(ls, "arg");
getargs
函数实现如下:
static int getargs(lua_State *ls, char **argv, int n)
{
int narg;
int i;
int argc = 0;
while (argv[argc])
argc++; /* count total number of arguments */
narg = argc - (n + 1); /* number of arguments to the script */
luaL_checkstack(ls, narg + 3, "too many arguments to script");
for (i = n + 1; i < argc; i++)
lua_pushstring(ls, argv[i]);
lua_createtable(ls, narg, n + 1);
for (i = 0; i < argc; i++) {
lua_pushstring(ls, argv[i]);
lua_rawseti(ls, -2, i - n);
}
return narg;
}
在getargs
函数中,传入参数n
是Lua
脚本在命令行参数的索引,而narg
则是脚本的参数。举个例子:
/root/shark/shark trace.lua 1 2
则argc
是4
,n
是1
,narg
是2
。
luaL_checkstack(ls, narg + 3, "too many arguments to script");
检查堆栈是否有足够的空间。
for (i = n + 1; i < argc; i++)
lua_pushstring(ls, argv[i]);
把参数1
和2
压入堆栈:
___________________________________________
|__________参数: 2__________________________| (-1)
| 参数: 1 | (-2)
|———————————————————————————————————————————
|___一个注册ll_shark函数数组的table___________| (-3)
|package.preload(类型:table,uv = luaopen_luv)| (-4)
lua_createtable(ls, narg, n + 1);
创建一个table
(包含narg
数组元素,n + 1
非数组元素)并压入堆栈:
———————————————————————————————————————————
|______table________________________________| (-1)
|__________参数: 2__________________________| (-2)
| 参数: 1 | (-3)
|———————————————————————————————————————————
|___一个注册ll_shark函数数组的table___________| (-4)
|package.preload(类型:table,uv = luaopen_luv)| (-5)
看最后一个循环:
for (i = 0; i < argc; i++) {
lua_pushstring(ls, argv[i]);
lua_rawseti(ls, -2, i - n);
}
lua_pushstring(ls, argv[i]);
依次把参数压入堆栈,lua_rawseti(ls, -2, i - n);
则是把参数传入table
:
—————————————————————————————————————————————————
|_table(index:value->1:shark;0:trace.lua;1:1;2:2_| (-1)
|__________参数: 2_______________________________| (-2)
| 参数: 1 | (-3)
|————————————————————————————————————————|
|___一个注册ll_shark函数数组的table________________| (-4)
|package.preload(类型:table,uv = luaopen_luv) | (-5)
lua_setglobal(ls, "arg");
作用是把栈顶table
弹出,并赋值给arg
。所以arg
就指向了这个table
(index:value->1:shark;0:trace.lua;1:1;2:2
)。堆栈变为:
____________________________________________
|__________参数: 2__________________________| (-1)
| 参数: 1 | (-2)
|———————————————————————————————————————————
|___一个注册ll_shark函数数组的table___________| (-3)
|package.preload(类型:table,uv = luaopen_luv)| (-4)
(10)
#include "shark_init.h"
luaL_loadbuffer(ls, luaJIT_BC_shark_init, luaJIT_BC_shark_init_SIZE,
NULL);
shark_init.h
是由shark_init.lua
生成的(以后再详细介绍shark_init.lua
),luaJIT_BC_shark_init
和luaJIT_BC_shark_init_SIZE
也定义在shark_init.h
文件中。
luaL_loadbuffer(ls, luaJIT_BC_shark_init, luaJIT_BC_shark_init_SIZE, NULL);
把luaJIT_BC_shark_init
这个chunk
压入堆栈:
____________________________________________
|_luaJIT_BC_shark_init chunk(类型:函数)______| (-1)
|__________参数: 2__________________________| (-2)
| 参数: 1 | (-3)
|———————————————————————————————————————————
|___一个注册ll_shark函数数组的table___________| (-4)
|package.preload(类型:table,uv = luaopen_luv)| (-5)
(11)
if((ret = lua_pcall(ls, 0, 0, 0))) {
ret = lua_report(ls, ret);
goto out;
}
接下来lua_pcall(ls, 0, 0, 0)
会运行luaJIT_BC_shark_init
这个chunk
。运行完后,把chunk
弹出堆栈:
————————————————————————————————————————————
|__________参数: 2__________________________| (-1)
| 参数: 1 | (-2)
|———————————————————————————————————————————
|___一个注册ll_shark函数数组的table___________| (-3)
|package.preload(类型:table,uv = luaopen_luv)| (-4)
lua_report
比较简单,就是如果出错的话,就从栈顶取出错误信息,打印完以后再弹栈:
int lua_report(lua_State *ls, int status)
{
if (status && !lua_isnil(ls, -1)) {
const char *msg = lua_tostring(ls, -1);
if (msg == NULL)
msg = "(error object is not a string)";
l_message(progname, msg);
lua_pop(ls, 1);
}
return status;
}
(12)
g_event_loop = luv_loop(ls);
if((ret = luaL_loadfile(ls, argv[script]))) {
ret = lua_report(ls, ret);
goto out;
}
base = lua_gettop(ls) - 1;
lua_pushcfunction(ls, lua_traceback);
lua_insert(ls, base);
if (lua_pcall(ls, 0, 0, base)) {
fprintf(stderr, "%s\n", lua_tostring(ls, -1));
exit(EXIT_FAILURE);
}
lua_pop(ls, 1);
//TODO: move to lua init code
uv_run(g_event_loop, UV_RUN_DEFAULT);
ret = 0;
out:
lua_close(ls);
return ret;
剩下这段代码就是运行脚本,其中lua_traceback
是脚本出错时的处理函数。个人觉得细节上还有些问题,需要和作者沟通一下,这块代码暂时留个小尾巴。
在kernel
代码中,很多.c
文件开头都会有pr_fmt
的定义,例如drivers\iommu\dmar.c
:
#define pr_fmt(fmt) KBUILD_MODNAME ": " fmt /* has to precede printk.h */
这个pr_fmt
是针对这个特定的模块定义的。看一下include\linux\printk.h
:
#ifndef pr_fmt
#define pr_fmt(fmt) fmt
#endif
可以看到,如果这个模块没有定义自己的pr_fmt
,那么就会使用默认的fmt
。自己定义pr_fmt
的好处是可以更清晰地打印这个模块的相关log
,便于以后调试。