CUDA编程笔记(17)——Matrix transpose (shared memory)

An Efficient Matrix Transpose in CUDA C/C++Coalesced Transpose Via Shared Memory一节讲述如何使用shared memory高效地实现matrix transpose

__global__ void transposeCoalesced(float *odata, const float *idata)
{
  __shared__ float tile[TILE_DIM][TILE_DIM];

  int x = blockIdx.x * TILE_DIM + threadIdx.x;
  int y = blockIdx.y * TILE_DIM + threadIdx.y;
  int width = gridDim.x * TILE_DIM;

  for (int j = 0; j < TILE_DIM; j += BLOCK_ROWS)
 tile[threadIdx.y+j][threadIdx.x] = idata[(y+j)*width + x];

  __syncthreads();

  x = blockIdx.y * TILE_DIM + threadIdx.x;  // transpose block offset
  y = blockIdx.x * TILE_DIM + threadIdx.y;

  for (int j = 0; j < TILE_DIM; j += BLOCK_ROWS)
 odata[(y+j)*width + x] = tile[threadIdx.x][threadIdx.y + j];
}

(1)idataodata分别是表示1024X1024float元素的matrix的连续内存:

IMG_20170216_145959[1]

(2)关于blockIdxthreadIdx的取值,参考下面的图:

IMG_20170216_151045[1]

shared memory请参考下面的图:

IMG_20170216_151058[1]

(3)在下列代码中:

for (int j = 0; j < TILE_DIM; j += BLOCK_ROWS)
    tile[threadIdx.y+j][threadIdx.x] = idata[(y+j)*width + x];

每一个block32X8大小,需要循环4次,把一个block内容copytile这个shared memory中。idata是按行读取的,因此是coalesced

IMG_20170216_152636[1]

(4)最难理解的在最后一部分:

x = blockIdx.y * TILE_DIM + threadIdx.x;  // transpose block offset
y = blockIdx.x * TILE_DIM + threadIdx.y;

for (int j = 0; j < TILE_DIM; j += BLOCK_ROWS)
    odata[(y+j)*width + x] = tile[threadIdx.x][threadIdx.y + j];

对比从idata读取数据和写数据到odata

......
tile[threadIdx.y+j][threadIdx.x] = idata[(y+j)*width + x];
......
odata[(y+j)*width + x] = tile[threadIdx.x][threadIdx.y + j];
......

可以看到是把tile做了transpose的数据(行变列,列变行)传给odata。而确定需要把tile放到哪里位置的代码:

x = blockIdx.y * TILE_DIM + threadIdx.x;  // transpose block offset
y = blockIdx.x * TILE_DIM + threadIdx.y;

假设blockIdx.x31blockIdx.y0threadIdx.x1threadIdx.y2。根据上述代码,计算xy

x = 0 * 32 + 1;
y = 31 * 32 + 2;

根据下面的图,可以看到是把东北角的内容copy的西南角:

IMG_20170216_155616[1]

与*NIX有关的杂志

本文介绍一些我接触过的与*nix有关的杂志。

首先要提到的就是Linux Journal(官方网址:http://www.linuxjournal.com/)。根据Wikipedia的介绍,这应该是最早的一本介绍Linux的杂志:

Linux Journal was the first magazine to be published about the Linux kernel and operating systems based on it. It was established in 1994.

不过Linux Journal现在不再发行纸质版了,只提供电子版。该杂志这段时间有一项促销活动:即截至到今年328日前,你只需花28.5美元(使用优惠码:2017ARCH可免10美元),就可以购买到从1994年到2016年杂志的电子合订版:

1

个人觉得还是很划算的,虽然有些文章已经年代久远,但是还是很有参考价值的。另外,Linux Journal也会将其文章发布到官网上供读者免费阅读。因次,是否愿意花钱买合订本或者订阅,就“仁者见仁,智者见智”了。

再说一下Linux Format(官方网址:http://www.linuxformat.com/)和Linux Voice(官方网址:https://www.linuxvoice.com/),二者都是英国出版的Linux杂志。不知是否因为Linux Voice的主创团队均出自Linux Format的缘故,二者有太多类似之处:都同时提供纸质版和电子版,都提供过刊的免费下载,等等。也许是由于版权原因,我在国内没见到过这两种杂志。在国外我阅读过纸质版,制作很精美,每期还附赠光盘。感兴趣的朋友可以下载它们提供的过刊了解一下。

以上提到的都是以Linux为主题的杂志,再介绍一个以BSD为主打内容的杂志:BSD magazine(官方网址:https://bsdmag.org/)。这是一本真正免费的杂志,订阅以后,你不需花一分钱,就会收到每一期。从这本杂志里,你可以获悉时下BSD家族的最新动态,虽然偶尔也会有Linux的内容出现。去年年底,这本杂志一度宣布要停刊了,不过目前又撤销了这个决定。我个人很希望这本杂志可以继续办下去。

最后,我很希望自己的国家能有一本中文版的Linux杂志。但是想想现在的情形,我们的时间都被其它的事物占去了,也许根本无法诞生这样一本杂志了。。。

后记:对于其它的类似杂志,比如:http://www.linux-magazine.com/。因为我没有一点了解,就不发表评论了。

如何选择Linux发行版?

@YeimMeMeMes 在其个人社交媒体主页上贴出了一张如何选择Linux发行版的图(原图链接:https://pbs.twimg.com/media/C3PoAagWMAAe5YT.jpg:large):

C3PoAagWMAAe5YT

因为这幅图上所列举的大部分Linux发行版我都没怎么使用过,所以我没有资格对这张图是否合理发表评论,仅供读者参考。下面我仅对我曾经使用过的一些Linux发行版谈些感受:

(1)这个图上并没有出现一些Linux的商业版本,譬如,RedHatRed Hat Enterprise LinuxSuSESUSE Linux Enterprise Server,等等。我以前做过这两个Linux商业版本上的测试工作,感觉还是很稳定的。给我一个很深的印象就是在Red Hat Enterprise Linux上编译和安装最新版本的Linux内核总是非常顺利,而在其它发行版上有时会遇到一些莫名其妙的问题。从去年开始,Red Hat Enterprise Linux对开发者已经免费了(可参考这篇文章:As in beer: Red Hat offers RHEL free to developers),有兴趣的朋友可以体验一下。

(2)最近两个月,在工作中我主要使用Arch LinuxArch Linux在软件包更新方面非常及时。有时你发现当前软件包不是最新的,只要在其网站上提一个请求,很快就会有维护者响应。如果你总是希望可以使用上最新的软件版本,不妨尝试一下Arch Linux

Linux系统上如何查看进程(线程)所运行的CPU

本文介绍如何在Linux系统上查看某个进程(线程)所运行的CPU,但在此之前我们需要弄清楚两个基本概念:

(1)Linux操作系统上的进程和线程没有本质区别,在内核看来都是一个task。属于同一个进程的各个线程共享某些资源,每一个线程都有一个ID,而“主线程”的线程ID同进程ID,也就是我们常说的PID是一样的。

(2)使用lscpu命令,可以得到当前系统CPU的数量:

$ lscpu
......
CPU(s):                24
On-line CPU(s) list:   0-23
Thread(s) per core:    2
Core(s) per socket:    6
Socket(s):             2
......

系统有2个物理CPUSocket(s): 2),每个CPU6coreCore(s) per socket: 6),而每个core又有2hardware threadThread(s) per core: 2)。所以整个系统上一共有2X6X2=24CPU(s):24)个逻辑CPU,也就是实际运行程序的CPU

使用htop命令可以得到进程(线程)所运行的CPU信息,但是htop默认情况下不会显示这一信息:

1
开启方法如下:
(1)启动htop后,按F2Setup):

2
(2) Setup中选择Columns,然后在Available Columns中选择PROCESSOR - ID of the CPU the process last executed, 接下来按F5Add)和F10Done)即可:

3

现在htop就会显示CPU的相关信息了。需要注意的是,其实htop显示的只是“进程(线程)之前所运行的CPU”,而不是“进程(线程)当前所运行的CPU”,因为有可能在htop显示的同时,操作系统已经把进程(线程)调度到其它CPU上运行了。

下面是一个运行时会包含4个线程的程序:

#include <omp.h>

int main(void){

        #pragma omp parallel num_threads(4)
        for(;;)
        {
        }

        return 0;
}

编译并运行代码:

$ gcc -fopenmp thread.c
$ ./a.out &
[1] 17235

使用htop命令可以得到各个线程ID,以及在哪个CPU上运行:

4

参考资料:
How to find out which CPU core a process is running on
闲侃CPU(一)

Linux线程模型浅析

Linux的线程是“轻量级进程”(Light-Weight Process,即LWP)。在Linux系统上运行一个程序时,操作系统会为这个程序创建一个进程,其实也就是“主线程”,后续则可以产生出更多的线程。每个进程都有一个PIDProcess ID),每个线程也会有一个TIDThread ID),属于同一进程的线程各自有拥有不同的TID,但它们的PID是相同的,都等于“主线程”的TID。因此从本质上来讲,Linux系统下的进程和线程没有区别,只不过同一进程中的线程可以共享某些资源。下面看一个例子:

#include <unistd.h>
#include <omp.h>

int main(void){

        #pragma omp parallel num_threads(4)
        for(;;)
        {
            sleep(1);
        }

        return 0;
}

编译并在后台运行这个程序:

$ gcc -fopenmp threads.c
$ ./a.out &
[1] 9802

进程的PID9802,用ps -T pid命令查看进程的线程信息:

$ ps -T 9802
  PID  SPID TTY      STAT   TIME COMMAND
 9802  9802 pts/1    Sl     0:00 ./a.out
 9802  9803 pts/1    Sl     0:00 ./a.out
 9802  9804 pts/1    Sl     0:00 ./a.out
 9802  9805 pts/1    Sl     0:00 ./a.out

其中SPID即为TID。可以看到当前进程的PID9802,共包含4个线程,其TID依次为:9802980398049805,其中PIDSPID相同的线程即为主线程。

CUDA编程笔记(16)——Shared Memory

这篇笔记摘自Professional CUDA C Programming

Global memory is large, on-board memory and is characterized by relatively high latencies. Shared memory is smaller, low-latency on-chip memory that offers much higher bandwidth than global memory. You can think of it as a program-managed cache. Shared memory is generally useful as:
➤ An intra-block thread communication channel
➤ A program-managed cache for global memory data
➤ Scratch pad memory for transforming data to improve global memory access patterns

Shared memory is partitioned among all resident thread blocks on an SM; therefore, shared memory is a critical resource that limits device parallelism. The more shared memory used by a kernel, the fewer possible concurrently active thread blocks.


CUDA编程笔记(15)——MEMORY ACCESS PATTERNS

这篇笔记摘自Professional CUDA C Programming

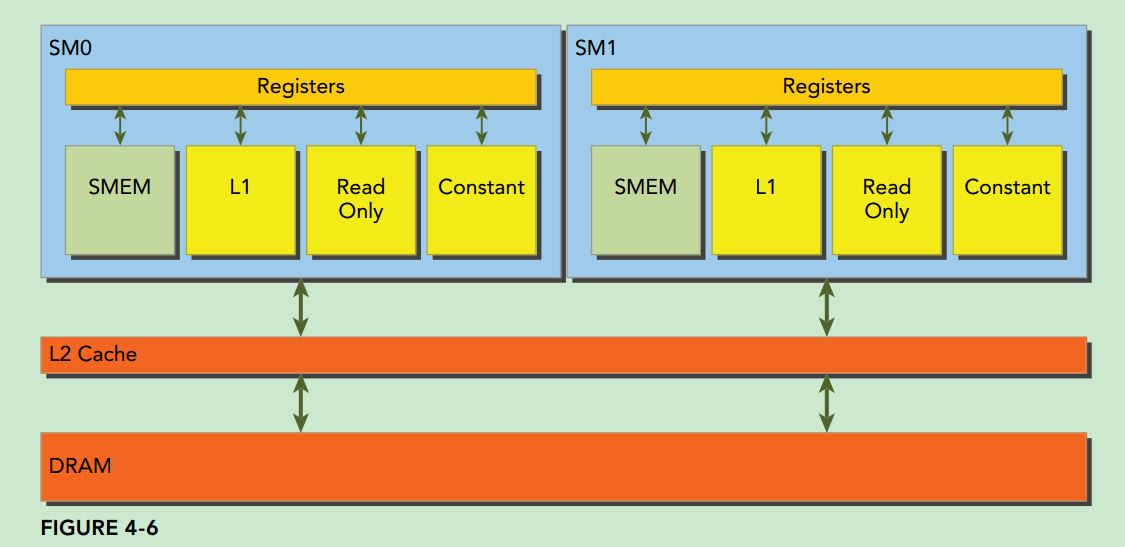
Global memory loads/stores are staged through caches, as shown in Figure 4-6. Global memory is a logical memory space that you can access from your kernel. All application data initially resides in DRAM, the physical device memory. Kernel memory requests are typically served between the device DRAM and SM on-chip memory using either 128-byte or 32-byte memory transactions.

All accesses to global memory go through the L2 cache. Many accesses also pass through the L1 cache, depending on the type of access and your GPU’s architecture. If both L1 and L2 caches are used, a memory access is serviced by a 128-byte memory transaction. If only the L2 cache is used, a memory access is serviced by a 32-byte memory transaction. On architectures that allow the L1 cache to be used for global memory caching, the L1 cache can be explicitly enabled or disabled at compile time.

An L1 cache line is 128 bytes, and it maps to a 128-byte aligned segment in device memory. If each thread in a warp requests one 4-byte value, that results in 128 bytes of data per request, which maps perfectly to the cache line size and device memory segment size.

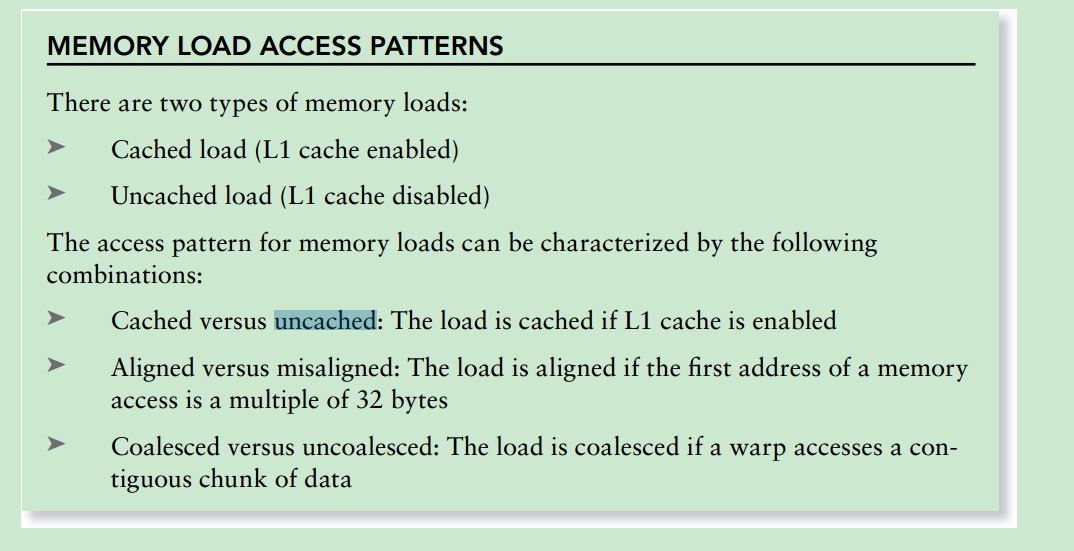
There are two characteristics of device memory accesses that you should strive for when optimizing your application:
➤ Aligned memory accesses
➤ Coalesced memory

capture

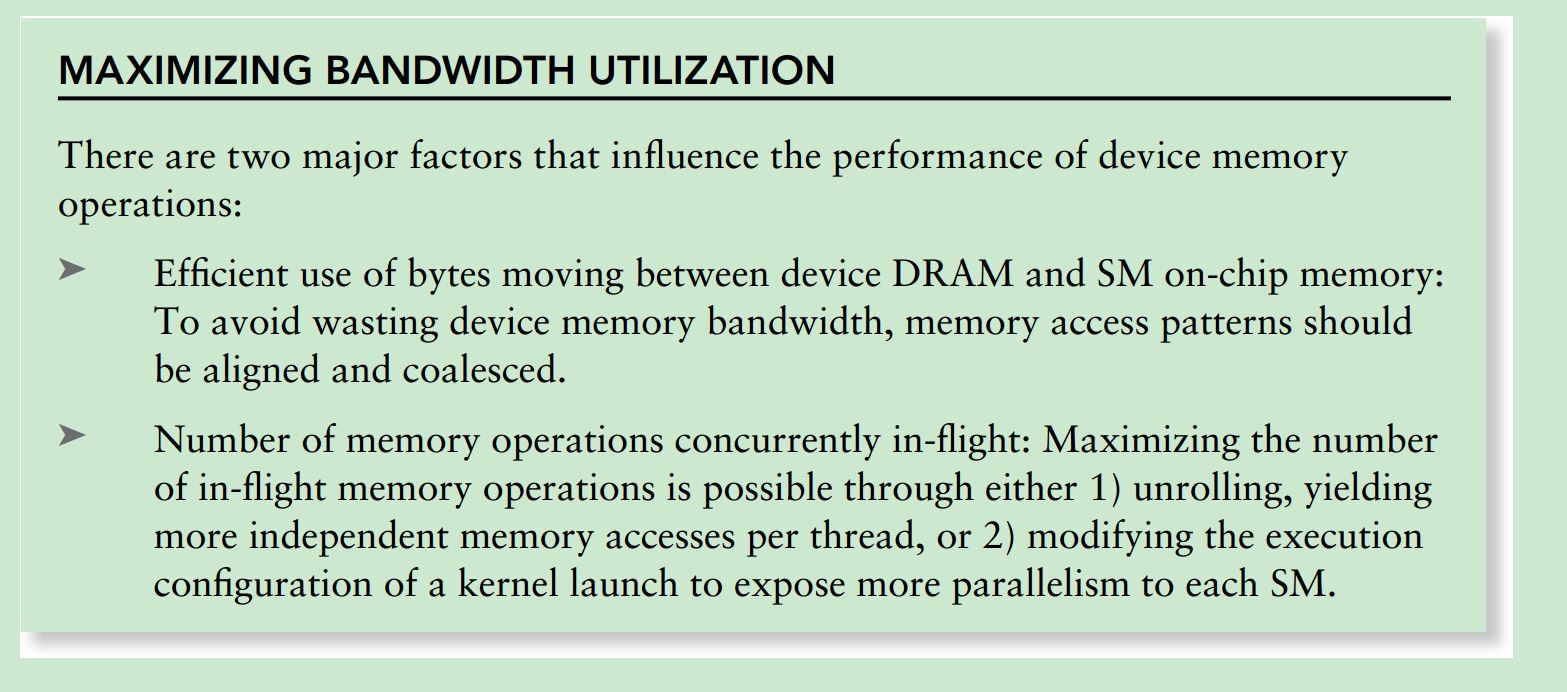
Aligned memory accesses occur when the frst address of a device memory transaction is an even multiple of the cache granularity being used to service the transaction (either 32 bytes for L2 cache or 128 bytes for L1 cache). Performing a misaligned load will cause wasted bandwidth.

Coalesced memory accesses occur when all 32 threads in a warp access a contiguous chunk of memory.

capture

Memory store operations are relatively simple. The L1 cache is not used for store operations on either Fermi or Kepler GPUs, store operations are only cached in the L2 cache before being sent to device memory. Stores are performed at a 32-byte segment granularity. Memory transactions can be one, two, or four segments at a time. For example, if two addresses fall within the same 128-byte region but not within an aligned 64-byte region, one four-segment transaction will be issued (that is, issuing a single four-segment transaction performs better than issuing two one-segment transactions).

capture

CUDA编程笔记(14)——zero-copy memory

这篇笔记摘自Professional CUDA C Programming

In general, the host cannot directly access device variables, and the device cannot directly access host variables. There is one exception to this rule: zero-copy memory. Both the host and device can access zero-copy memory.

GPU threads can directly access zero-copy memory. There are several advantages to using zero-copy memory in CUDA kernels, such as:
➤ Leveraging host memory when there is insufficient device memory
➤ Avoiding explicit data transfer between the host and device
➤ Improving PCIe transfer rates
When using zero-copy memory to share data between the host and device, you must synchronize memory accesses across the host and device. Modifying data in zero-copy memory from both the host and device at the same time will result in undefned behavior.

There are two common categories of heterogeneous computing system architectures: Integrated and discrete.

In integrated architectures, CPUs and GPUs are fused onto a single die and physically share main memory. In this architecture, zero-copy memory is more likely to benefit both performance and programmability because no copies over the PCIe bus are necessary.

For discrete systems with devices connected to the host via PCIe bus, zero-copy memory is advantageous only in special cases.

Because the mapped pinned memory is shared between the host and device, you must synchronize memory accesses to avoid any potential data hazards caused by multiple threads accessing the same memory location without synchronization.

Be careful to not overuse zero-copy memory. Device kernels that read from zero-copy memory can be very slow due to its high-latency.


CUDA编程笔记(13)——pinned memory

这篇笔记摘自Professional CUDA C Programming

Allocated host memory is by default pageable, that is, subject to page fault operations that move data in host virtual memory to different physical locations as directed by the operating system. Virtual memory offers the illusion of much more main memory than is physically available, just as the L1 cache offers the illusion of much more on-chip memory than is physically available.

The GPU cannot safely access data in pageable host memory because it has no control over when the host operating system may choose to physically move that data. When transferring data from pageable host memory to device memory, the CUDA driver first allocates temporary page-locked or pinned host memory, copies the source host data to pinned memory, and then transfers the data from pinned memory to device memory, as illustrated on the left side of Figure 4-4.

capture

The CUDA runtime allows you to directly allocate pinned host memory using:
cudaError_t cudaMallocHost(void **devPtr, size_t count);
This function allocates count bytes of host memory that is page-locked and accessible to the device. Since the pinned memory can be accessed directly by the device, it can be read and written with much higher bandwidth than pageable memory. However, allocating excessive amounts of pinned memory might degrade host system performance, since it reduces the amount of pageable memory available to the host system for storing virtual memory data.