Swarmkit笔记(5)——Node.Run()函数

Swarmd程序的精髓就是Node.Run()函数。刨除前面一大堆CA验证的相关代码,下面是实际执行manageragent的部分。

......
managerReady := make(chan struct{})
agentReady := make(chan struct{})
var managerErr error
var agentErr error
var wg sync.WaitGroup
wg.Add(2)
go func() {
    managerErr = n.runManager(ctx, securityConfig, managerReady) // store err and loop
    wg.Done()
    cancel()
}()
go func() {
    agentErr = n.runAgent(ctx, db, securityConfig.ClientTLSCreds, agentReady)
    wg.Done()
    cancel()
}()
......

如果node的角色是agent,则runManager goroutine就会阻塞在Node.waitRole()这里:

func (n *Node) runManager(ctx context.Context, securityConfig *ca.SecurityConfig, ready chan struct{}) error {
    for {
        n.waitRole(ctx, ca.ManagerRole)
        ......
    }
}

因此只有Node.runAgent()这个goroutine可以顺畅执行。

如果node的角色是manager,则runManagerrunAgent这两个goroutine都会运行,即manager本身也是一个agent

Swarmkit笔记(4)——swarmd命令选项

Swarmd程序支持的命令选项:

func init() {
    mainCmd.Flags().BoolP("version", "v", false, "Display the version and exit")
    mainCmd.Flags().StringP("log-level", "l", "info", "Log level (options \"debug\", \"info\", \"warn\", \"error\", \"fatal\", \"panic\")")
    mainCmd.Flags().StringP("state-dir", "d", "./swarmkitstate", "State directory")
    mainCmd.Flags().StringP("join-token", "", "", "Specifies the secret token required to join the cluster")
    mainCmd.Flags().String("engine-addr", "unix:///var/run/docker.sock", "Address of engine instance of agent.")
    mainCmd.Flags().String("hostname", "", "Override reported agent hostname")
    mainCmd.Flags().String("listen-remote-api", "0.0.0.0:4242", "Listen address for remote API")
    mainCmd.Flags().String("listen-control-api", "./swarmkitstate/swarmd.sock", "Listen socket for control API")
    mainCmd.Flags().String("listen-debug", "", "Bind the Go debug server on the provided address")
    mainCmd.Flags().String("join-addr", "", "Join cluster with a node at this address")
    mainCmd.Flags().Bool("force-new-cluster", false, "Force the creation of a new cluster from data directory")
    mainCmd.Flags().Uint32("heartbeat-tick", 1, "Defines the heartbeat interval (in seconds) for raft member health-check")
    mainCmd.Flags().Uint32("election-tick", 3, "Defines the amount of ticks (in seconds) needed without a Leader to trigger a new election")
    mainCmd.Flags().Var(&externalCAOpt, "external-ca", "Specifications of one or more certificate signing endpoints")
}

(1)versionlog-levelhostname最简单,不必细说。
(2)state-dir目录存储远端manager以及CA认证等相关信息:

# ls -alt
total 24
drwx------ 5 root root 4096 Jul 29 02:40 .
drwx------ 4 root root 4096 Jul 29 02:40 raft
-rw------- 1 root root   63 Jul 29 02:40 state.json
drwxr-xr-x 2 root root 4096 Jul 29 02:40 worker
drwxr-xr-x 2 root root 4096 Jul 29 02:40 certificates
drwxr-xr-x 3 root root 4096 Jul 29 02:40 ..

(3)join-tokennode用来加入某个clustertoken,在第一次认证请求时会被用到。
(4)engine-addr指定实际用来执行executorengine位置,默认是使用本机Docker
(5)listen-remote-api指定监听一个tcp port,用来接收和处理其它node的访问请求。
(6)listen-control-api指定一个Unix socket,用来接收和处理swarmctl程序的访问请求。
(7)listen-debug指定监听一个用来debug程序的端口。
(8)join-addr指定要加入的cluster的一个node地址,通过连接这个node来加入这个cluster
(9)其余force-new-clusterheartbeat-tickelection-tickexternal-ca解释的都很清楚,不必赘述。

Swarmkit笔记(3)——swarmd程序框架

agent.Node结构体有4channel,理解它们的作用就可以理解swarmd程序的框架:

// Node implements the primary node functionality for a member of a swarm
// cluster. Node handles workloads and may also run as a manager.
type Node struct {
    ......
    started              chan struct{}
    stopped              chan struct{}
    ready                chan struct{} // closed when agent has completed registration and manager(if enabled) is ready to receive control requests
    ......
    closed               chan struct{}
    ......
}

swarmd程序的框架(其中executor通过engine-addr得到,代表最终运行task的实体,实际是一个Docker engineapi.APIClient。其它参数都通过命令行直接得到。):

        ......
        // Create a context for our GRPC call
        ctx, cancel := context.WithCancel(context.Background())
        defer cancel()

        ......

        n, err := agent.NewNode(&agent.NodeConfig{
            Hostname:         hostname,
            ForceNewCluster:  forceNewCluster,
            ListenControlAPI: unix,
            ListenRemoteAPI:  addr,
            JoinAddr:         managerAddr,
            StateDir:         stateDir,
            JoinToken:        joinToken,
            ExternalCAs:      externalCAOpt.Value(),
            Executor:         executor,
            HeartbeatTick:    hb,
            ElectionTick:     election,
        })
        if err != nil {
            return err
        }

        if err := n.Start(ctx); err != nil {
            return err
        }

        c := make(chan os.Signal, 1)
        signal.Notify(c, os.Interrupt)
        go func() {
            <-c
            n.Stop(ctx)
        }()

        go func() {
            select {
            case <-n.Ready():
            case <-ctx.Done():
            }
            if ctx.Err() == nil {
                logrus.Info("node is ready")
            }
        }()

        return n.Err(ctx)

(1)

if err := n.Start(ctx); err != nil {
    return err
}

看一下Node.Start()函数的实现:

// Start starts a node instance.
func (n *Node) Start(ctx context.Context) error {
    select {
    case <-n.started:
        select {
        case <-n.closed:
            return n.err
        case <-n.stopped:
            return errAgentStopped
        case <-ctx.Done():
            return ctx.Err()
        default:
            return errAgentStarted
        }
    case <-ctx.Done():
        return ctx.Err()
    default:
    }

    close(n.started)
    go n.run(ctx)
    return nil
}

如果执行Node.Start()时没有任何异常发生,就会把Node.started这个channel关掉(close(n.started)),然后启动这个节点初始化过程:go n.run(ctx)

(2)

c := make(chan os.Signal, 1)
signal.Notify(c, os.Interrupt)
go func() {
    <-c
    n.Stop(ctx)
}()

这段代码的含义是用户按Ctrl+C可以中断程序。Node.Stop()函数实现如下:

// Stop stops node execution
func (n *Node) Stop(ctx context.Context) error {
    select {
    case <-n.started:
        select {
        case <-n.closed:
            return n.err
        case <-n.stopped:
            select {
            case <-n.closed:
                return n.err
            case <-ctx.Done():
                return ctx.Err()
            }
        case <-ctx.Done():
            return ctx.Err()
        default:
            close(n.stopped)
            // recurse and wait for closure
            return n.Stop(ctx)
        }
    case <-ctx.Done():
        return ctx.Err()
    default:
        return errAgentNotStarted
    }
}

由于此时Node.started这个channel已经被关掉,所以会永远执行select的第一个case分支:case <-n.started。然后会根据当时的情况,再决定执行哪个分支。

(3)

go func() {
    select {
        case <-n.Ready():
        case <-ctx.Done():
    }
    if ctx.Err() == nil {
        logrus.Info("node is ready")
    }
}()

Node.Ready()函数会返回Node.ready这个channel

// Ready returns a channel that is closed after node's initialization has
// completes for the first time.
func (n *Node) Ready() <-chan struct{} {
    return n.ready
}

Node初始化完成后,Node.ready这个channel就会被关掉。因此如果一切顺利的话,就会看到“node is ready”的log

(4)

return n.Err(ctx)

Node.Err()函数的实现:

// Err returns the error that caused the node to shutdown or nil. Err blocks
// until the node has fully shut down.
func (n *Node) Err(ctx context.Context) error {
    select {
    case <-n.closed:
        return n.err
    case <-ctx.Done():
        return ctx.Err()
    }
}

Node.Err()函数阻塞在这里,等待Node关闭。
 

FreeBSD kernel 笔记(3)——设备名字

在使用下列函数

int makedevs(struct makedevargs *args, struct cdev **cdev, const char *fmt, …);

struct cdev * make_dev(struct cdevsw *cdevsw, int unit, uidt uid, gidt gid, int perms, const char *fmt, …);

为设备创建cdev结构体时,fmt用来指定设备的名字:

The name is the expansion of fmt and following arguments as printf(9) would print it. The name determines its path under /dev or other devfs(5) mount point and may contain slash `/’ char- acters to denote subdirectories.

也就是/dev下面节点的名字。

cdevsw结构体中的d_name指定的是driver的名字:

struct cdevsw {
    ......
    const char      *d_name;
    ......
}

一个driver可以用来操作多个设备。

参考资料:
MAKE_DEV

FreeBSD kernel 笔记(2)——“preparing a device”和“preparing a device for I/O”

preparing (or initializing) a device”通常发生在加载设备驱动模块时,举例如下:

static int hello_modevent(module_t mod __unused, int /* modeventtype_t */ event, void *arg __unused)
{
    ......
    switch (event) 
    {
        case MOD_LOAD:
        {
            make_dev_args_init(&args);
            args.mda_devsw = &hello_cdevsw;
            args.mda_uid = UID_ROOT;
            args.mda_gid = GID_WHEEL;
            args.mda_mode = 0600;
            uprintf("Hello is loaded:%d\n", make_dev_s(&args, &hello_dev, "hello"));
            break;
        }
        ......
    }
    return error;
}

preparing a device for I/O”则是发生在open这个设备时,比如cdevsw结构体的d_open函数:

struct cdevsw {
    ......
    d_open_t        *d_open;  
    ......
}

FreeBSD kernel 笔记(1)——什么是KLD?

下面内容选自 FreeBSD Device Drivers

A device driver can be either statically compiled into the system or dynamically loaded using a loadable kernel module (KLD).

NOTE: Most operating systems call a loadable kernel module an LKM—FreeBSD just had to be different.

A KLD is a kernel subsystem that can be loaded, unloaded, started, and stopped after bootup. In other words, a KLD can add functionality to the kernel and later remove said functionality while the system is running. Needless to say, our “functionality” will be device drivers.

In general, two components are common to all KLDs:
 A module event handler
 A DECLARE_MODULE macro call


Swarmkit笔记(1)——概述

SwarmkitDocker公司新开源的一个项目,它用来创建和管理cluster。默认情况下使用Docker container来运行任务,但不限于此。

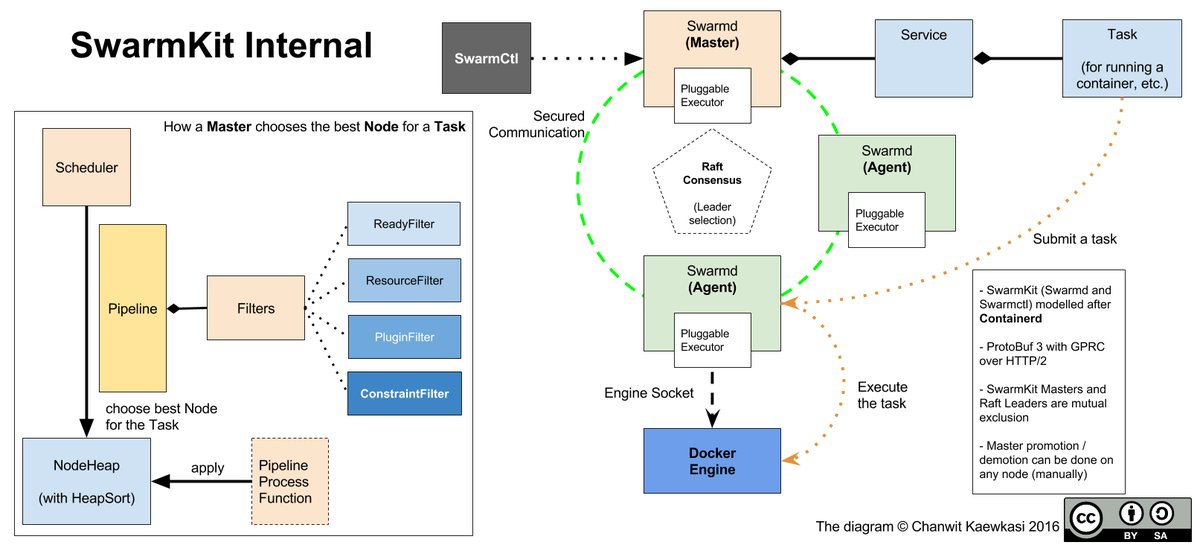
Cluster中的node分成两种:managerworkerManager node负责接收用户指令和管理clusterworker node则是通过executor执行task(默认executor即为Docker container)。Task可以组织成Service。此外,一组manager通过Raft协议形成一个组,并会选出一个leader。只有leader处理所有的请求,其它的成员只是把请求传给leader

Swarmkit提供了两个可执行程序:swarmdswarmctlswarmd用来部署在cluster中的每一个node上,彼此间互相通信,组成cluster;而swarmctl则用来向整个cluster“发号施令”。 下图可以更清楚地描述Swarmkit的内部机制(图片出处:https://pbs.twimg.com/media/Ckb8EMLVAAQrxYH.jpg):

Ckb8EMLVAAQrxYH

参考资料:
docker-swarmkit

Nomenclature

Swarmkit Internal


docker笔记(12)——docker 1.12集成docker swarm功能

docker 1.12集成了docker swarm功能。根据Docker Swarm Is Dead. Long Live Docker Swarm.这篇文章,对比docker swarmdocker 1.12有以下优点:
(1)

With swarm mode you create a swarm with the ‘init’ command, and add workers to the cluster with the ‘join’ command. The commands to create and join a swarm literally take a second or two to complete. Mouat said “Comparing getting a Kubernetes or Mesos cluster running, Docker Swarm is a snap”.

Communication between nodes on the swarm is all secured with Transport Layer Security (TLS). For simple setups, Docker 1.12 generates self-signed certificates to use when you create the swarm, or you can provide certificates from your own certificate authority. Those certificates are only used internally by the nodes; any services you publicly expose use your own certs as usual.

docker 1.12实现的swarm模式更简单,并且node之间使用TLS机制进行通信。

(2)

The self-awareness of the swarm is the biggest and most significant change. Every node in the swarm can reach every other node, and is able to route traffic where it needs to go. You no longer need to run your own load balancer and integrate it with a dynamic discovery agent, using tools like Nginx and Interlock.

Now if a node receives a request which it can’t fulfil, because it isn’t running an instance of the container that can process the request, it routes the request on to a node which can fulfil it. This is transparent to the consumer, all they see is the response to their request, they don’t know about any redirections that happened within the swarm.

docker 1.12swarm模式自带“self-awareness”和“load-balance”机制,并且可以把请求路由到符合要求的node

docker 1.12swarm模式相关的文件默认存放在/var/lib/docker/swarm这个文件夹下面。

关于docker 1.12swarm模式的demo,可参考这个video

Update:docker 1.12其实是利用swarmkit这个project来实现docker swarm cluster功能(相关代码位于daemon/cluster这个目录)。

参考资料:
The relation between “docker/swarm” and “docker/swarmkit”
Comparing Swarm, Swarmkit and Swarm Mode
Docker 1.12 Swarm Mode – Under the hood