When using old ISO file to install Arch Linux, please remember to refresh archlinux-keyring package first:
# pacman -Sy archlinux-keyring
Otherwise, you will come across similar errors from this post.
When using old ISO file to install Arch Linux, please remember to refresh archlinux-keyring package first:
# pacman -Sy archlinux-keyring
Otherwise, you will come across similar errors from this post.
On a new installed Arch Linux server, I come across the following problem:
# locale -a
locale: Cannot set LC_CTYPE to default locale: No such file or directory
locale: Cannot set LC_MESSAGES to default locale: No such file or directory
locale: Cannot set LC_COLLATE to default locale: No such file or directory
C
POSIX
# locale
locale: Cannot set LC_CTYPE to default locale: No such file or directory
locale: Cannot set LC_MESSAGES to default locale: No such file or directory
locale: Cannot set LC_ALL to default locale: No such file or directory
LANG=en_US.UTF-8
LC_CTYPE="en_US.UTF-8"
LC_NUMERIC="en_US.UTF-8"
LC_TIME="en_US.UTF-8"
LC_COLLATE="en_US.UTF-8"
LC_MONETARY="en_US.UTF-8"
LC_MESSAGES="en_US.UTF-8"
LC_PAPER="en_US.UTF-8"
LC_NAME="en_US.UTF-8"
LC_ADDRESS="en_US.UTF-8"
LC_TELEPHONE="en_US.UTF-8"
LC_MEASUREMENT="en_US.UTF-8"
LC_IDENTIFICATION="en_US.UTF-8"
LC_ALL=
Especially when using man command:
# man wait
man: can't set the locale; make sure $LC_* and $LANG are correct
After referring this post, I fix the issue. My /etc/locale.conf is like this:
# cat /etc/locale.conf
LANG=en_US.UTF-8
But en_US.UTF-8 is commented out in /etc/locale.gen:
#en_US.UTF-8 UTF-8
uncomment it, then run locale-gen command, all become normal.
Check following simple C++ program:
#include <mutex>

int main(void)
{
    std::mutex m;
    m.lock();

    return 0;
}
The mutex m forgot unlock itself before exiting main function:
m.unlock();
Test it on GNU/Linux, and I chose ArchLinux as the testbed:
$ uname -a
Linux fujitsu-i 4.13.7-1-ARCH #1 SMP PREEMPT Sat Oct 14 20:13:26 CEST 2017 x86_64 GNU/Linux
$ clang++ -g -pthread -std=c++11 test_mutex.cpp
$ ./a.out
$
The process exited normally, and no more words was given. Build and run it on OpenBSD 6.2:
# clang++ -g -pthread -std=c++11 test_mutex.cpp
# ./a.out
pthread_mutex_destroy on mutex with waiters!
The OpenBSD prompts “pthread_mutex_destroy on mutex with waiters!“. Interesting!
Last Friday, a colleague told me that when connecting an invalid address, the client using gRPC will block forever. To verify it, I use the example code shipped in gRPC:
GreeterClient greeter(grpc::CreateChannel(
  "localhost:50051", grpc::InsecureChannelCredentials()));
Change the "localhost:50051" to "badhost:50051", then compile and execute the program. Sure enough, the client hang without any response. At the outset, I thought it should be a common issue, and there must be a solution already. So I just submitted a post in the discussion group, although there was some responses, but since they were not the satisfactory explanations, I knew I need to trouble-shooting myself.
(1) The first thing I wanted to make sure was whether the network card had sent requests to badhost or not, so I used tcpdump to capture the packets:
$ sudo tcpdump -A -s 0 'port 50051' -i enp7s0f0
But there isn’t any data captured. To double-confirm, I also used tcpconnect program to check:
$ sudo tcpconnect -P 50051
PID    COMM         IP SADDR            DADDR            DPORT
Still nothing output.
(2) Although I couldn’t find the connect request to port 50051, no matter what application on *NIX, it will definitely call connect function at the end. So I changed the tactic, and tried to find who calls the connect:
a) Build gRPC with debugging info (The reason of using “PKG_CONFIG_PATH=/usr/lib/openssl-1.0/pkgconfig” is here):
$ PKG_CONFIG_PATH=/usr/lib/openssl-1.0/pkgconfig CC=clang CXX=clang++ CFLAGS="-g -O0" CXXFLAGS="-g -O0" make
b) Modify the Makefile to build client program with debugging info:
CXXFLAGS += -g -std=c++11
c) Use gdb to debug the program, after starting it, set breakpoint at connect function:
$ gdb -q greeter_client
Reading symbols from greeter_client...done.
(gdb) start
Temporary breakpoint 1 at 0x146fe: file greeter_client.cc, line 74.
Starting program: /home/xiaonan/Project/grpc/examples/cpp/helloworld/greeter_client
[Thread debugging using libthread_db enabled]
Using host libthread_db library "/usr/lib/libthread_db.so.1".

Temporary breakpoint 1, main (argc=1, argv=0x7fffffffea88) at greeter_client.cc:74
74      int main(int argc, char** argv) {
(gdb) b connect
Breakpoint 2 at 0x7ffff6619b80 (2 locations)
Then continue executing the program. When the breakpoint was hit, check the stack:
(gdb) c
Continuing.
[New Thread 0x7ffff4edc700 (LWP 28396)]
[New Thread 0x7ffff46db700 (LWP 28397)]
[Switching to Thread 0x7ffff4edc700 (LWP 28396)]

Thread 2 "greeter_client" hit Breakpoint 2, 0x00007ffff6619b80 in connect () from /usr/lib/libc.so.6

(gdb) bt
#0  0x00007ffff6619b80 in connect () from /usr/lib/libc.so.6
#1  0x00007ffff664e61e in open_socket () from /usr/lib/libc.so.6
#2  0x00007ffff664f156 in __nscd_open_socket () from /usr/lib/libc.so.6
#3  0x00007ffff664ccc6 in __nscd_getai () from /usr/lib/libc.so.6
#4  0x00007ffff66038bc in gaih_inet.constprop () from /usr/lib/libc.so.6
#5  0x00007ffff6604724 in getaddrinfo () from /usr/lib/libc.so.6
#6  0x00007ffff714ee1e in ?? () from /usr/lib/libgrpc.so.4
#7  0x00007ffff714f38c in ?? () from /usr/lib/libgrpc.so.4
#8  0x00007ffff714d020 in ?? () from /usr/lib/libgrpc.so.4
#9  0x00007ffff714cf12 in ?? () from /usr/lib/libgrpc.so.4
#10 0x00007ffff71fff57 in ?? () from /usr/lib/libgrpc.so.4
#11 0x00007ffff7755049 in start_thread () from /usr/lib/libpthread.so.0
#12 0x00007ffff6618f0f in clone () from /usr/lib/libc.so.6
Then continue to run the program, the breakpoint was hit again:
(gdb) bt
#0  0x00007ffff6619b80 in connect () from /usr/lib/libc.so.6
#1  0x00007ffff664e61e in open_socket () from /usr/lib/libc.so.6
#2  0x00007ffff664f156 in __nscd_open_socket () from /usr/lib/libc.so.6
#3  0x00007ffff664ccc6 in __nscd_getai () from /usr/lib/libc.so.6
#4  0x00007ffff66038bc in gaih_inet.constprop () from /usr/lib/libc.so.6
#5  0x00007ffff6604724 in getaddrinfo () from /usr/lib/libc.so.6
#6  0x00007ffff714ee1e in ?? () from /usr/lib/libgrpc.so.4
#7  0x00007ffff714f38c in ?? () from /usr/lib/libgrpc.so.4
#8  0x00007ffff714d020 in ?? () from /usr/lib/libgrpc.so.4
#9  0x00007ffff714cf12 in ?? () from /usr/lib/libgrpc.so.4
#10 0x00007ffff71fff57 in ?? () from /usr/lib/libgrpc.so.4
#11 0x00007ffff7755049 in start_thread () from /usr/lib/libpthread.so.0
#12 0x00007ffff6618f0f in clone () from /usr/lib/libc.so.6
(gdb)
Oh, I see! The resolving of badhost must be failed, so there would definitely no subsequent connecting port 50051. But why the client was trying to resolve name again and again? If I find this cause, it can explain why client was blocking.
(3) Since there is ?? from /usr/lib/libgrpc.so.4, I can’t know which function was the culprit. I can go over the code, but I think I need the direct proof. Build gRPC with CC=clang CXX=clang++ CFLAGS="-g -O0" CXXFLAGS="-g -O0" seems not enough. After some tweaking, I come out the following solutions:
a) According to the Makefile:
# TODO(nnoble): the strip target is stripping in-place, instead
# of copying files in a temporary folder.
# This prevents proper debugging after running make install.
“make install” will strip the debugging information, so instead of executing “make install” command, I set LD_LIBRARY_PATH environment variable to let client link library in the specified directory:
$ export LD_LIBRARY_PATH=/home/xiaonan/Project/grpc/libs/opt
b) Hardcode -g in the Makefile:
CFLAGS += -g -std=c99 -Wsign-conversion -Wconversion $(W_SHADOW) $(W_EXTRA_SEMI)
CXXFLAGS += -g -std=c++11
Then the symbols can all be resolved:
(gdb) bt
#0  0x00007ffff6486b80 in connect () from /usr/lib/libc.so.6
#1  0x00007ffff64bb61e in open_socket () from /usr/lib/libc.so.6
#2  0x00007ffff64bbae2 in __nscd_get_mapping () from /usr/lib/libc.so.6
#3  0x00007ffff64bbed5 in __nscd_get_map_ref () from /usr/lib/libc.so.6
#4  0x00007ffff64b9ba3 in __nscd_getai () from /usr/lib/libc.so.6
#5  0x00007ffff64708bc in gaih_inet.constprop () from /usr/lib/libc.so.6
#6  0x00007ffff6471724 in getaddrinfo () from /usr/lib/libc.so.6
#7  0x00007ffff7473ec5 in blocking_resolve_address_impl (name=0x55555578edf0 "badhost:50051",
    default_port=0x555555790220 "https", addresses=0x55555578f1f0) at src/core/lib/iomgr/resolve_address_posix.c:83
#8  0x00007ffff74742e3 in do_request_thread (exec_ctx=0x7ffff5043c30, rp=0x55555578e630, error=<optimized out>)
    at src/core/lib/iomgr/resolve_address_posix.c:157
#9  0x00007ffff7472b86 in run_closures (exec_ctx=<optimized out>, list=...) at src/core/lib/iomgr/executor.c:64
#10 executor_thread (arg=0x555555789fc0) at src/core/lib/iomgr/executor.c:152
#11 0x00007ffff74e5286 in thread_body (v=<optimized out>) at src/core/lib/support/thd_posix.c:42
#12 0x00007ffff6181049 in start_thread () from /usr/lib/../lib64/libpthread.so.0
#13 0x00007ffff6485f0f in clone () from /usr/lib/libc.so.6
Now I just need to step-into code, and the information of this issue can also be referred here.
During the whole process, I used sniffer tool (tcpdump), kernel tracing tool(tcpconnect, which belongs to bcc and utilizes eBPF), networking knowledge (set breakpoint on connect function), debugging tool (gdb), and the trick of linking library (set LD_LIBRARY_PATH to bypass installing gRPC), that’s why I call the whole procedure “leverage comprehensive debugging tricks”.
The establishment of SSH session consists of 2 parts: build up the encryption channel and authenticate user. To understand the whole flow better, I usetcpdump/Wireshark to capture and analyze the packets. Server is OpenBSD 6.1 and client is ArchLinux. The tcpdump command is like this:
sudo tcpdump -A -s 0 'net 192.168.38.176' -i enp7s0f0 -w capture.pcap
(1) Connect server first time:

The captured packets:

We can see the client/server negotiated SSH version first (In fact, client and server sent SSH version simultaneously, so please don’t misunderstand client sent first, then server responded. Use “nc 192.168.38.176 22” command to check.)
, then exchanged public key to generate secret key. The server issued “New Keys” message, and waited for client to answer.
(2) Accept server’s public key but not input password:

The captured packets:

The first packet should be client acknowledged server’s “New Keys” message, then there are some interactions. Now the encryption channel is set up.
(3) Enter password and authenticate user:

The captured packets:
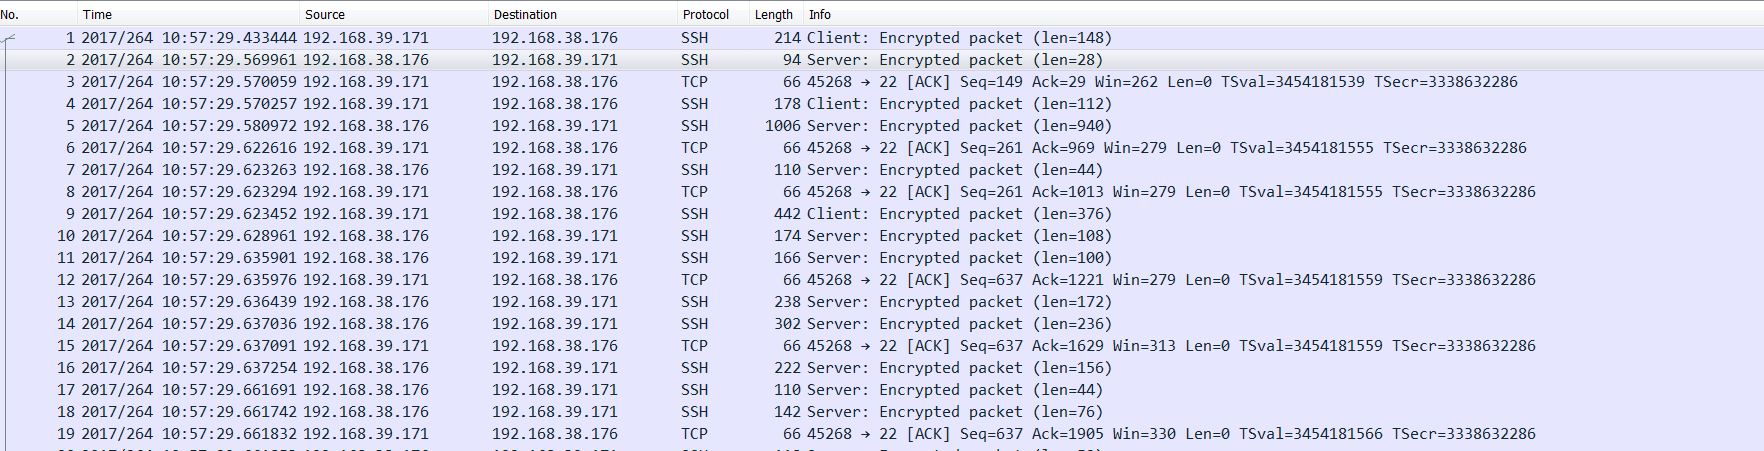
These packets are all encrypted data. If user’s password is correct, the whole SSH session will be ready, and you can administrator server now.
Reference:
Understanding the SSH Encryption and Connection Process.