The basics of Client/Server socket programming

While Client/Server communication model is ubiquitous nowadays, most of them involve socket programming knowledge. In this post, I will introduce some rudimentary aspects of it:

(1) Short/Long-lived TCP connection.
Short-lived TCP connection refers to following pattern: Client creates a connection to server; send message, then close the connection. If Client wants to transmit information again, repeat the above steps. Because establishing and destroying TCP sessions have overhead, if Client needs to have transactions with Server frequently, long-lived connection may be a better choice: connect Server; deliver message, deliver message, …, disconnect Server. A caveat about long-lived connection is Client may need to send heartbeat message to Server to keep the TCP session active.

(2) Synchronous/Asynchronous communication.
After Client sends the request, it can block here to wait for Server’s response, this is called synchronous mode. Certainly the Client should set a timer in case the response never come. The Client can also choose not to block, and continue to do other things. On the contrary, this is called asynchronous mode. If the Client can send multiple requests before receiving responses, it needs to add ID for every message, so it can distinguish the corresponding response for every request.

(3) Error handling.
A big pain point of socket programming is you need to consider so many exceptional cases. For example, the Server suddenly crashes; the network cable is plugged out, or the response message is half-received, etc. So your code should process as many abnormalities as possible. It is no exaggeration to say that error-handling code quality is the cornerstone of program’s robustness.

(4) Portability.
Different *NIX flavors may have small divergences on socket programming, so the program works well on Linux may not guarantee it also run as you expect on FreeBSD. BTW, I summarized a post about tips of Solaris/illumos socket programming before, and you can read it if you happen to work on these platforms.

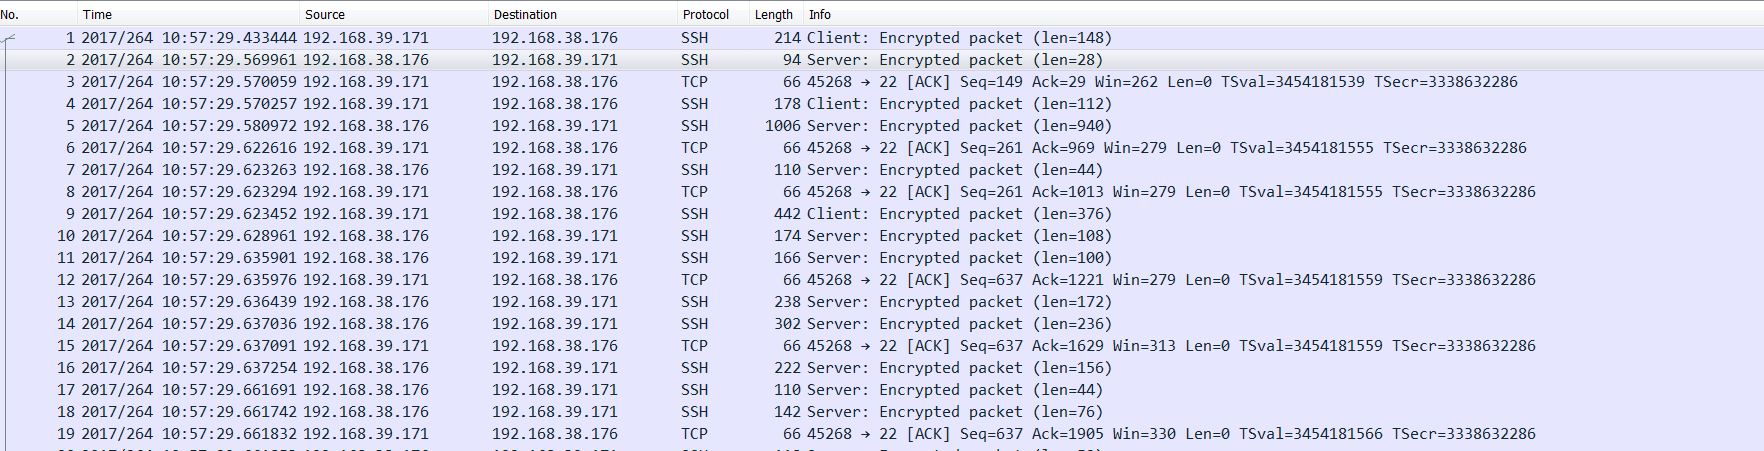
(5) Leverage sniffer tools.
Tcpdump/Wireshark/snoop are amazing tools for debugging network programming, and they can tell you what really happens under the hood. Try to be sophisticated at these tools, and they will save you at one day, trust me!


Use network analyzer to learn SSH session establishment

The establishment of SSH session consists of 2 parts: build up the encryption channel and authenticate user. To understand the whole flow better, I usetcpdump/Wireshark to capture and analyze the packets. Server is OpenBSD 6.1 and client is ArchLinux. The tcpdump command is like this:

sudo tcpdump -A -s 0 'net 192.168.38.176' -i enp7s0f0 -w capture.pcap

(1) Connect server first time:

1

The captured packets:

C1

We can see the client/server negotiated SSH version first (In fact, client and server sent SSH version simultaneously, so please don’t misunderstand client sent first, then server responded. Use “nc 192.168.38.176 22” command to check.)

, then exchanged public key to generate secret key. The server issued “New Keys” message, and waited for client to answer.

(2) Accept server’s public key but not input password:

2

The captured packets:

C2

The first packet should be client acknowledged server’s “New Keys” message, then there are some interactions. Now the encryption channel is set up.

(3) Enter password and authenticate user:

3

The captured packets:

C3

These packets are all encrypted data. If user’s password is correct, the whole SSH session will be ready, and you can administrator server now.

Reference:
Understanding the SSH Encryption and Connection Process.

Configure Thunderbird to send patch friendly

Recently, I have tried outlook and web gmail to send patches to OpenBSD, but neither of them is an ideal choice. For example, the original patch is:

Index: dmesg.c
===================================================================
RCS file: /cvs/src/sbin/dmesg/dmesg.c,v
retrieving revision 1.29
diff -u -p -r1.29 dmesg.c
--- dmesg.c     1 Sep 2017 07:31:45 -0000       1.29
+++ dmesg.c     4 Sep 2017 08:55:50 -0000
@@ -65,12 +65,12 @@ main(int argc, char *argv[])
        int ch, newl, skip, i;
        char *p;
        struct msgbuf cur;
-       char *memf, *nlistf, *bufdata = NULL;
+       char *memf = NULL, *nlistf = NULL, *bufdata = NULL;
        char *allocated = NULL;
        int startupmsgs = 0;
        char buf[5];

-       memf = nlistf = NULL;
+       memset(&cur, 0, sizeof(cur));
        while ((ch = getopt(argc, argv, "sM:N:")) != -1)
                switch(ch) {
                case 's':

The actual effect of sending patch using above tools:

Index: dmesg.c
===================================================================
RCS file: /cvs/src/sbin/dmesg/dmesg.c,v
retrieving revision 1.29
diff -u -p -r1.29 dmesg.c
--- dmesg.c 1 Sep 2017 07:31:45 -0000   1.29
+++ dmesg.c 4 Sep 2017 08:55:50 -0000
@@ -65,12 +65,12 @@ main(int argc, char *argv[])
    int ch, newl, skip, i;
    char *p;
    struct msgbuf cur;
-   char *memf, *nlistf, *bufdata = NULL;
+   char *memf = NULL, *nlistf = NULL, *bufdata = NULL;
    char *allocated = NULL;
    int startupmsgs = 0;
    char buf[5];

-   memf = nlistf = NULL;
+   memset(&cur, 0, sizeof(cur));
    while ((ch = getopt(argc, argv, "sM:N:")) != -1)
    switch(ch) {
    case 's':

We can see the spaces in the left part of code are lost. After referring Completely plain email and Thunderbird (GUI), I decide to useThunderbird as the email client, but need further customization:

(1) All sent mails are plain text: “Account Settings” -> “Composition & Addressing“, untick “Compose message in HTML format“:

1

Or before sending mail: “Options” -> “Delivery Format” -> “Plain Text Only“.

(2) “Tools” -> “Options” -> “Advanced” -> “Config Editor...“:

2

Set mailnews.send_plaintext_flowed to false:

3

Now the patch format is correct.

Build gRPC on ArchLinux

Today, I followed Build from Source to compile gRPC on ArchLinux:

 $ git clone -b $(curl -L https://grpc.io/release) https://github.com/grpc/grpc
 $ cd grpc
 $ git submodule update --init
 $ make

Current gRPC‘s release version is v1.4.x:

$ curl -L https://grpc.io/release
v1.4.x

The build flow will generate the errors like this:

......
src/core/lib/support/murmur_hash.c: In function ‘gpr_murmur_hash3’:
src/core/lib/support/murmur_hash.c:79:10: error: this statement may fall through [-Werror=implicit-fallthrough=]
       k1 ^= ((uint32_t)tail[2]) << 16;
       ~~~^~~~~~~~~~~~~~~~~~~~~~~~~~~~
src/core/lib/support/murmur_hash.c:80:5: note: here
     case 2:
     ^~~~
src/core/lib/support/murmur_hash.c:81:10: error: this statement may fall through [-Werror=implicit-fallthrough=]
       k1 ^= ((uint32_t)tail[1]) << 8;
       ~~~^~~~~~~~~~~~~~~~~~~~~~~~~~~
src/core/lib/support/murmur_hash.c:82:5: note: here
     case 1:
     ^~~~
cc1: all warnings being treated as errors
......

After referring Fix warnings with GCC 7, I finally make the compilation successful. To facilitate others to build gRPC v1.4.x source code on ArchLinux, I create a patch, and hope it can help others.

P.S.
(1) You should fallback to OpenSSL 1.0. Please refer here:

PKG_CONFIG_PATH=/usr/lib/openssl-1.0/pkgconfig make

Otherwise you may encounter following errors:

src/core/tsi/ssl_transport_security.c: In function ‘tsi_create_ssl_client_handshaker_factory’:
src/core/tsi/ssl_transport_security.c:1281:3: error: ‘TLSv1_2_method’ is deprecated [-Werror=deprecated-declarations]
   ssl_context = SSL_CTX_new(TLSv1_2_method());
   ^~~~~~~~~~~
In file included from /usr/include/openssl/ct.h:13:0,
                 from /usr/include/openssl/ssl.h:61,
                 from src/core/tsi/ssl_transport_security.c:45:
/usr/include/openssl/ssl.h:1624:1: note: declared here
 DEPRECATEDIN_1_1_0(__owur const SSL_METHOD *TLSv1_2_method(void)) /* TLSv1.2 */
 ^
src/core/tsi/ssl_transport_security.c: In function ‘tsi_create_ssl_server_handshaker_factory_ex’:
src/core/tsi/ssl_transport_security.c:1389:7: error: ‘TLSv1_2_method’ is deprecated [-Werror=deprecated-declarations]
       impl->ssl_contexts[i] = SSL_CTX_new(TLSv1_2_method());
       ^~~~
In file included from /usr/include/openssl/ct.h:13:0,
                 from /usr/include/openssl/ssl.h:61,
                 from src/core/tsi/ssl_transport_security.c:45:
/usr/include/openssl/ssl.h:1624:1: note: declared here
 DEPRECATEDIN_1_1_0(__owur const SSL_METHOD *TLSv1_2_method(void)) /* TLSv1.2 */
 ^
At top level:
src/core/tsi/ssl_transport_security.c:118:22: error: ‘openssl_thread_id_cb’ defined but not used [-Werror=unused-functio ]
 static unsigned long openssl_thread_id_cb(void) {
                      ^~~~~~~~~~~~~~~~~~~~
src/core/tsi/ssl_transport_security.c:110:13: error: ‘openssl_locking_cb’ defined but not used [-Werror=unused-function]
 static void openssl_locking_cb(int mode, int type, const char *file, int line) {
             ^~~~~~~~~~~~~~~~~~
cc1: all warnings being treated as errors

(2) You may need to change installation directory from /usr/local to /usr:

make prefix=/usr install

This lets you process pkg-config path easily.

Parse BPF_ARRAY macro in bcc

BPF_ARRAY is a very common macro used in bcc scripts. To analyze it, I put all BPF_ARRAY related macros in an example file:

// Changes to the macro require changes in BFrontendAction classes
#define BPF_F_TABLE(_table_type, _key_type, _leaf_type, _name, _max_entries, _flags) \
struct _name##_table_t { \
  _key_type key; \
  _leaf_type leaf; \
  _leaf_type * (*lookup) (_key_type *); \
  _leaf_type * (*lookup_or_init) (_key_type *, _leaf_type *); \
  int (*update) (_key_type *, _leaf_type *); \
  int (*insert) (_key_type *, _leaf_type *); \
  int (*delete) (_key_type *); \
  void (*call) (void *, int index); \
  void (*increment) (_key_type); \
  int (*get_stackid) (void *, u64); \
  _leaf_type data[_max_entries]; \
  int flags; \
}; \
__attribute__((section("maps/" _table_type))) \
struct _name##_table_t _name = { .flags = (_flags) }

#define BPF_TABLE(_table_type, _key_type, _leaf_type, _name, _max_entries) \
BPF_F_TABLE(_table_type, _key_type, _leaf_type, _name, _max_entries, 0);

#define BPF_ARRAY1(_name) \
  BPF_TABLE("array", int, u64, _name, 10240)
#define BPF_ARRAY2(_name, _leaf_type) \
  BPF_TABLE("array", int, _leaf_type, _name, 10240)
#define BPF_ARRAY3(_name, _leaf_type, _size) \
  BPF_TABLE("array", int, _leaf_type, _name, _size)

// helper for default-variable macro function
#define BPF_ARRAYX(_1, _2, _3, NAME, ...) NAME

// Define an array function, some arguments optional
// BPF_ARRAY(name, leaf_type=u64, size=10240)
#define BPF_ARRAY(...) \
  BPF_ARRAYX(__VA_ARGS__, BPF_ARRAY3, BPF_ARRAY2, BPF_ARRAY1)(__VA_ARGS__)

enum stat_types {
  S_COUNT = 1,
  S_MAXSTAT
};

void main(void)
{
  BPF_ARRAY(stats, u64, S_MAXSTAT + 1); 
}

Use gcc -E to preprocess it (I have formatted code to make it clear):

# 1 "test.c"
# 1 "<built-in>"
# 1 "<command-line>"
# 31 "<command-line>"
# 1 "/usr/include/stdc-predef.h" 1 3 4
# 32 "<command-line>" 2
# 1 "test.c"
# 38 "test.c"
enum stat_types {
    S_COUNT = 1,
    S_MAXSTAT
};

void main(void)
{
    struct stats_table_t { 
      int key; 
      u64 leaf; 
      u64 * (*lookup) (int *); 
      u64 * (*lookup_or_init) (int *, u64 *); 
      int (*update) (int *, u64 *); 
      int (*insert) (int *, u64 *); 
      int (*delete) (int *);
      void (*call) (void *, int index); 
      void (*increment) (int); 
      int (*get_stackid) (void *, u64); 
      u64 data[S_MAXSTAT + 1]; 
      int flags; 
    }; 
    __attribute__((section("maps/" "array"))) struct stats_table_t stats = { .flags = (0) };;
}

Let’s analyze how the final result is got:

(1)

BPF_ARRAY(stats, u64, S_MAXSTAT + 1)    

will be expanded to (__VA_ARGS__ will be replaced by all arguments):

BPF_ARRAYX(stats, u64, S_MAXSTAT + 1, BPF_ARRAY3, BPF_ARRAY2, BPF_ARRAY1)(stats, u64, S_MAXSTAT + 1)

(2) According to:

// helper for default-variable macro function
#define BPF_ARRAYX(_1, _2, _3, NAME, ...) NAME

BPF_ARRAYX(stats, u64, S_MAXSTAT + 1, BPF_ARRAY3, BPF_ARRAY2, BPF_ARRAY1)(stats, u64, S_MAXSTAT + 1) will be replaced by following code:

BPF_ARRAY3(stats, u64, S_MAXSTAT + 1)

We can compared it to BPF_ARRAY1 (both _leaf_type and size have default values) and BPF_ARRAY2 (only size have default value.).

(3) Convert BPF_ARRAY3 to final BPF_F_TABLE is more straightforward, so I won’t drill that down.

Use the same method you can analyze other macros, such as BPF_HASH. Hope this small post can give you a tip!