The subtlety of building ANTLR C runtime library

If you want to use ANTLR C runtime library, you should pay attention that it will be compiled to 32-bit library by default even in 64-bit platform:

# ./configure
......
# make
make  all-am
make[1]: Entering directory '/root/Project/libantlr3c-3.4'
/bin/sh ./libtool  --tag=CC   --mode=compile gcc -DHAVE_CONFIG_H -I. -Iinclude    -m32  -O2  -Wall -MT antlr3baserecognizer.lo -MD -MP -MF .deps/antlr3baserecognizer.Tpo -c -o antlr3baserecognizer.lo `test -f 'src/antlr3baserecognizer.c' || echo './'`src/antlr3baserecognizer.c
libtool: compile:  gcc -DHAVE_CONFIG_H -I. -Iinclude -m32 -O2 -Wall -MT antlr3baserecognizer.lo -MD -MP -MF .deps/antlr3baserecognizer.Tpo -c src/antlr3baserecognizer.c  -fPIC -DPIC -o .libs/antlr3baserecognizer.o
In file included from /usr/include/features.h:434:0,
                 from /usr/include/bits/libc-header-start.h:33,
                 from /usr/include/stdio.h:28,
                 from include/antlr3defs.h:248,
                 from include/antlr3baserecognizer.h:39,
                 from src/antlr3baserecognizer.c:9:
/usr/include/gnu/stubs.h:7:11: fatal error: gnu/stubs-32.h: No such file or directory
 # include <gnu/stubs-32.h>
           ^~~~~~~~~~~~~~~~
compilation terminated.
make[1]: *** [Makefile:449: antlr3baserecognizer.lo] Error 1
make[1]: Leaving directory '/root/Project/libantlr3c-3.4'
make: *** [Makefile:308: all] Error 2

In order to build 64-bit library, you should specify --enable-64bit option during configure stage:

./configure --enable-64bit

Then it will be generated to 64-bit library.

The anatomy of “Hello World” python program in bcc

The bcc gives a simple Hello World program analysis, but I want to give a more detailed anatomy of it:

from bcc import BPF

BPF(text='int kprobe__sys_clone(void *ctx) { bpf_trace_printk("Hello, World!\\n"); return 0; }').trace_print()

(1)

from bcc import BPF  

bcc is a package, and it will be installed in Python‘s site-packages directory. Take my server as an example:

>>> import bcc
>>> bcc.__path__
['/usr/lib/python3.6/site-packages/bcc']

BPF is a class defined in __init__.py file of bcc:

......
class BPF(object):
# From bpf_prog_type in uapi/linux/bpf.h
    SOCKET_FILTER = 1
    KPROBE = 2
......

(2) Divide

BPF(text='int kprobe__sys_clone(void *ctx) { bpf_trace_printk("Hello, World!\\n"); return 0; }').trace_print()

into 2 parts:

BPF(text='int kprobe__sys_clone(void *ctx) { bpf_trace_printk("Hello, World!\\n"); return 0; }')

and

trace_print()

a)

BPF(text='int kprobe__sys_clone(void *ctx) { bpf_trace_printk("Hello, World!\\n"); return 0; }')

This statement will create a BPF object, and the code is simplified as following:

......
from .libbcc import lib, _CB_TYPE, bcc_symbol, _SYM_CB_TYPE 
......
class BPF(object):
......
    def __init__(self, src_file="", hdr_file="", text=None, cb=None, debug=0,
        cflags=[], usdt_contexts=[]):
        ......

        if text:
            self.module = lib.bpf_module_create_c_from_string(text.encode("ascii"),
            self.debug, cflags_array, len(cflags_array))
        else:
            ......

        self._trace_autoload()

Check libbcc.py:

lib = ct.CDLL("libbcc.so.0", use_errno=True)

We can see lib module is indeed libbcc dynamic library, and bpf_module_create_c_from_string is implemented as this:

void * bpf_module_create_c_from_string(const char *text, unsigned flags, const char *cflags[], int ncflags) {
    auto mod = new ebpf::BPFModule(flags);
    if (mod->load_string(text, cflags, ncflags) != 0) {
        delete mod;
        return nullptr;
    }
    return mod;
}

We won’t delve it too much, and just know it returns a ebpf module is enough.

For self._trace_autoload() part, we can check _trace_autoload method definition:

def _trace_autoload(self):
    for i in range(0, lib.bpf_num_functions(self.module)):
        func_name = str(lib.bpf_function_name(self.module, i).decode())
        if func_name.startswith("kprobe__"):
            fn = self.load_func(func_name, BPF.KPROBE)
            self.attach_kprobe(event=fn.name[8:], fn_name=fn.name)
        elif func_name.startswith("kretprobe__"):
            fn = self.load_func(func_name, BPF.KPROBE)
            self.attach_kretprobe(event=fn.name[11:], fn_name=fn.name)
        elif func_name.startswith("tracepoint__"):
            fn = self.load_func(func_name, BPF.TRACEPOINT)
            tp = fn.name[len("tracepoint__"):].replace("__", ":")
            self.attach_tracepoint(tp=tp, fn_name=fn.name)

Based on above code, we can see bcc now supports kprobe, kretprobe and tracepoint. For Hello World example, it actually execute attach_kprobemethod:

def attach_kprobe(self, event="", fn_name="", event_re="",
        pid=-1, cpu=0, group_fd=-1):

    ......

    event = str(event)
    self._check_probe_quota(1)
    fn = self.load_func(fn_name, BPF.KPROBE)
    ev_name = "p_" + event.replace("+", "_").replace(".", "_")
    res = lib.bpf_attach_kprobe(fn.fd, 0, ev_name.encode("ascii"),
            event.encode("ascii"), pid, cpu, group_fd,
            self._reader_cb_impl, ct.cast(id(self), ct.py_object))
    res = ct.cast(res, ct.c_void_p)
    ......
    self._add_kprobe(ev_name, res)
    return self

Finally, it will call libbcc‘s bpf_attach_kprobe function. Until now, the kprobe is attached successfully, and attach_kprobe will return a BPF object.

(b)

BPF(...).trace_print()

The trace_print method is not too hard:

def trace_print(self, fmt=None):
    ......
    try:
        while True:
            if fmt:
                fields = self.trace_fields(nonblocking=False)
                if not fields: continue
                line = fmt.format(*fields)
            else:
                line = self.trace_readline(nonblocking=False)
            print(line)
            sys.stdout.flush()
    except KeyboardInterrupt:
        exit()

For fmt=None case, it just calls trace_readline(), which read from trace pipe, and prints it on the stdout:

print(line)
sys.stdout.flush()

That’s all, and hope you enjoy bcc and ebpf!

Install bcc on ArchLinux

To install bcc on ArchLinux, firstly you need to setup yaourt from AUR:

$ git clone https://aur.archlinux.org/yaourt.git
$ cd yaourt
$ makepkg -si

Then execute yaourt bcc command:

# yaourt bcc
1 aur/bcc 0.3.0-1 [installed] (17) (2.51)
    BPF Compiler Collection - C library and examples
2 aur/bcc-git v0.1.8.r330.52cd371-1 (2) (0.06)
    BPF Compiler Collection - C library and examples
3 aur/bcc-tools 0.3.0-1 [installed] (17) (2.51)
    BPF Compiler Collection - Tools
4 aur/bcc-tools-git v0.1.8.r330.52cd371-1 (2) (0.06)
    BPF Compiler Collection - Tools
......

Select the order number of bcc, bcc-tools, python-bcc and python2-bcc, and install them.

Once finished, the bcc would be installed in the directory of /usr/share/bcc:

# ls
examples  man  tools

To facilitate your daily work, you can add man pages and tools in your .bashrc file:

MANPATH=/usr/share/bcc/man:$MANPATH
PATH=/usr/share/bcc/tools:$PATH

You can also install from source code:

git clone https://github.com/iovisor/bcc.git
mkdir bcc/build; cd bcc/build
cmake .. -DCMAKE_INSTALL_PREFIX=/usr
make
sudo make install

P.S. To run tools shipped in bcc, you need to install kernel header files:

sudo pacman -S linux-headers

Update on 28/10/2020
Currently, bcc is the official package and split to 3 pieces: bccbcc-tools and python-bcc. Please install all 3 packages. If you forgot to install python-bcc, when running commands from bcc-tools, you will come across following errors:

# /usr/share/bcc/tools/execsnoop
Traceback (most recent call last):
  File "/usr/share/bcc/tools/execsnoop", line 21, in <module>
    from bcc import BPF
ModuleNotFoundError: No module named 'bcc'

Use perf and FlameGraph to profile program on Linux

In most Linux environments, the perf tools should be set up by default. Otherwise, you can install it manually. E.g., in ArchLinux:

# pacman -S perf

Use following program as an example (It is a rifacimento from here, and you should only focus on the framework of the code):

# cat test.cpp
#include <NTL/ZZX.h>

using namespace std;
using namespace NTL;

void inner(int i, ZZX& t, Vec<ZZX>& phi)
{
        for (long j = 1; j <= i-1; j++)
         if (i % j == 0)
            t *= phi(j);
}

void outer(int i, Vec<ZZX>& phi)
{
        ZZX t;
        t = 1;
        inner(i, t, phi);
        phi(i) = (ZZX(INIT_MONO, i) - 1)/t;
        cout << phi(i) << "\n";
}

int main()
{
   Vec<ZZX> phi(INIT_SIZE, 100);

   for (long i = 1; i <= phi.length(); i++) {
      outer(i, phi);
   }
}

Compile it:

# g++ -g -O2 -pthread test.cpp -lntl -lgmp

It is suggested that using -g -O2 options since -g can provide debug information which perf needs and -O2 can generate lots of optimizations.

Use perf record to sample the program:

# perf record --call-graph dwarf ./a.out
......
[ perf record: Woken up 2 times to write data ]
[ perf record: Captured and wrote 0.318 MB perf.data (38 samples) ]

To profile an already running program, use -p pid flag. A perf.data file will be generated in current directory, and you can use perf report command to parse it:

# perf report

The detailed information of every function will be showed:

Capture

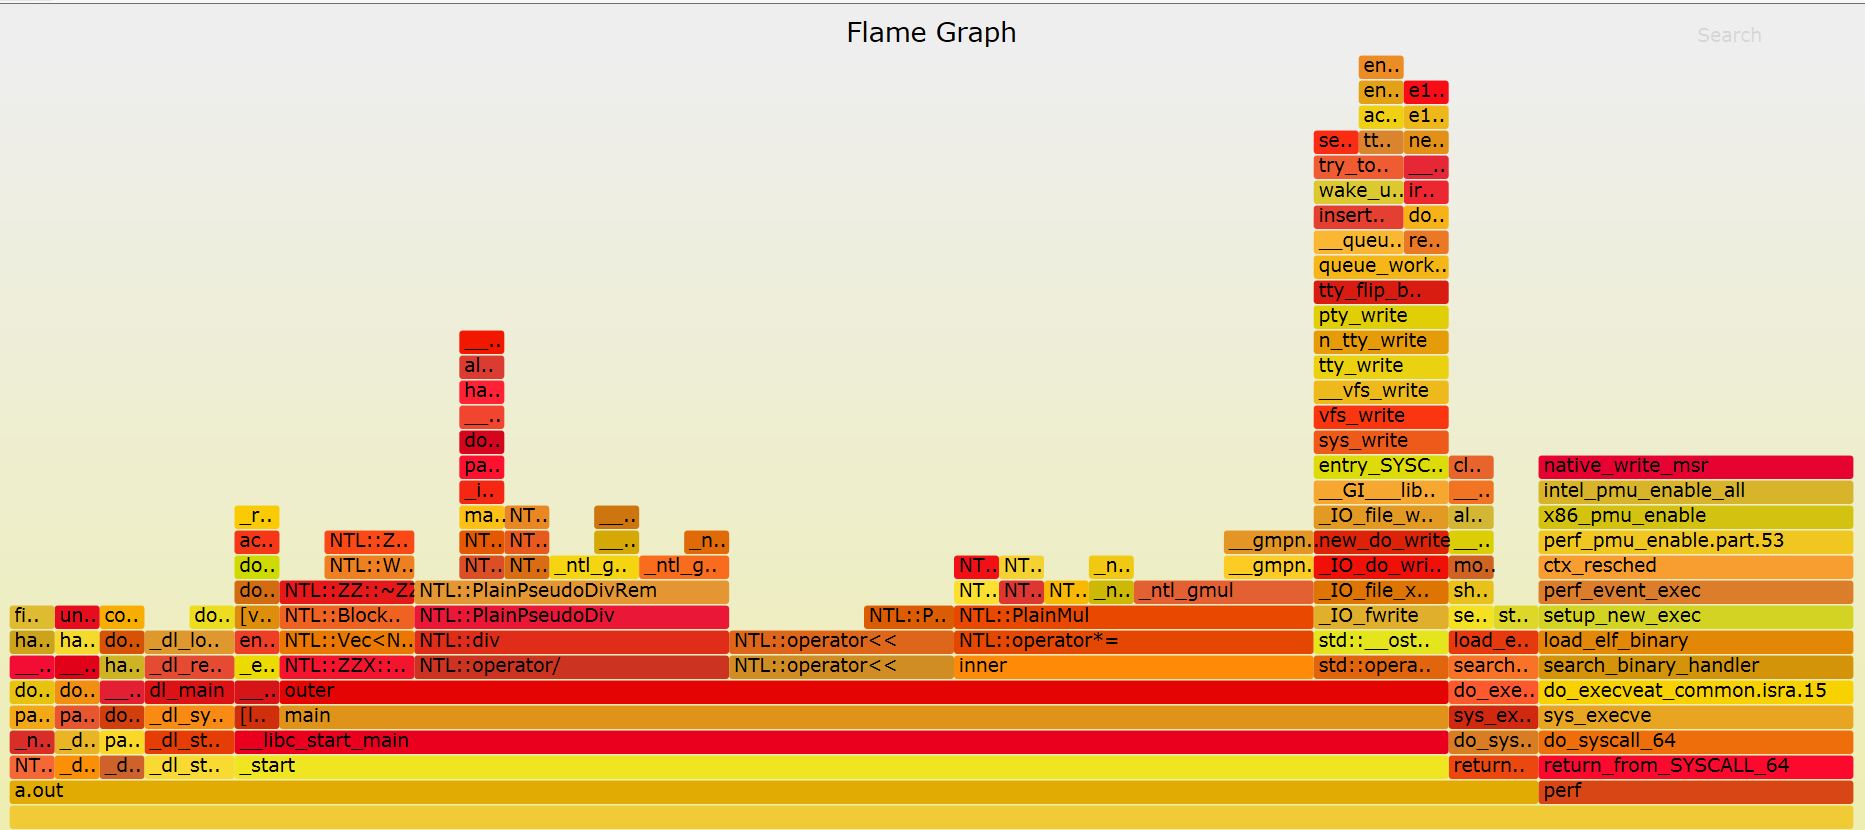
Another awesome tool is FlameGraph which is used to analyze stack call traces:

# git clone --depth 1 https://github.com/brendangregg/FlameGraph
# cd FlameGraph

Copy perf.data into current directory:

# cp ../perf.data ./

Execute following command:

# perf script | ./stackcollapse-perf.pl |./flamegraph.pl > perf.svg

The perf.svg is like this:

FlameGraph

You can see the whole stack frameworks and functions’ consume time ratio.

P.S., the full code is here.

Use Source Insight as the editor to develop Unix softwares

Source Insight is my favorite editor, and I have used it for more than 10 years. But when employing it to develop Unix software, you will run into annoying line break issue, which is on windows, the newline is \r\n while in Unix it is \n only. Therefore you will see the file edited in Source Insight will display an extra ^M in Unix environment:

#include <stdio.h>^M
^M
int main(void)^M
{^M
        printf("\r\n");^M
}^M

To resolve this problem, you can refer this topic in stackoverflow:

To save a file with a specific end-of-line type in Source Insight, select File -> Save As…, then where it says “Save as type”, select the desired end-of-line type.

To set the end-of-line type for new files you create in Source Insight, select Options -> Preferences and click the Files tab. Where it says “Default file format” select the desired end-of-line type.

So you can set Unix file format as you wanted:

Capture

Another caveat you should pay attention is if you use git Windows client, by default, it will convert the newline of project from \n to \r\n directly. My solution is just disabling this auto conversion feature:

git config --global core.autocrlf false